I assume in what follows that you have a fair bit of experience with woodworking - if you don't you should begin with much simpler projects than a harpsichord. You should also love working with fine wood for its own sake - you are unlikely to spend less than 300 hours building even the simplest harpsichord. If you want the finish of a professional instrument, you should love finishing too - professional builders often spend longer on the case finishing than on the assembly.
There are advantages to building your own instrument. There is the sheer joy in listening to a sound that you yourself have coaxed out of raw wood. You will know every detail of its construction, so will feel at ease maintaining it in perfect voice. And, if its building does not take time away from paying work, you can save money.
First, contact Hubbard Harpsichords and check out their kits. You can make an instrument as fine as has ever been made using one of Hubbard's kits. It is a lot of work to find wood good enough to build a good harpsichord from scratch, not to mention waiting for it to age adequately and finding all those other little pieces you need.
I regret that I must expand on this. I tried to find a rather particular kind of wood, it is true, but I still had no wood after two years of trying. The first firm that accepted an order, Northern Tonewoods, for black spruce from Labrador, kept saying "the weather is bad - we can't get out in the woods" for half a year, then that they had had "a fire" and please resubmit the order, then stopped answering email. The second, West Wind Hardwood Inc., described the sizes of yellow cedar they had in stock. I laid out the instrument around the best size, placed the order, then they said that they really didn't have that size after all, but we have this smaller size. This procedure was repeated three times before I gave up on them. The third firm, R.A.W.Resources, accepted the order and a down payment for cutting. Six months later they responded to my progress query that they "had a computer crash" and asked me to resend the order. A year later, they said that the wood had been ready to be shipped for several months and would go out the next day. Finally my sister drove there for a visit. There never was any wood at R.A.W. (I've ordered dozens of books from ABE Books over the Internet with no problems - what's with wood dealers?)
So, Hubbard's prices are a very good deal if they have a kit that you want. And, no one could be more helpful if you run into problems at any stage of building one.
Anyway, for more options, do a Google for "R.K. Lee harpsichord"; he has prepared complete working drawings of many harpsichord styles and several stores carry them. Your chance of success is much higher working from his tested designs than designing from scratch.
But if, as I was, you are set on the sound of a specific old instrument that isn't available from Hubbard or Lee, understand the risks you are taking (not to mention putting up with hassles such as above if you cannot find your materials locally), locate a copy of Frank Hubbard's "Three Centuries of Harpsichord Making", locate the archives of the harpsichord makers' list and read on. You will find here some details that are not in Hubbard, and get the flavour of building a one-off instrument in a small workshop (actually, one now set up for making guitars) rather than the production methods of a professional in an established shop.
What follows focuses on why rather than how. I follow many whom I admire in that quest, but here, talking of harpsichords, I quote Frank Hubbard: "You must understand what maker and composer and performer were driving at in order to recreate their world."
When I was a student, almost no one was making harpsichords that sounded like the old ones. In England, the prevailing attitude was that of the Dolmetsch's: we'll never be able to divine the secrets of the ancients, so why even try. The few makers (Hubbard, Dowd, Skowroneck, Schütze) who were trying had a waiting list of five years or more. When I wrote to Martin Skowroneck (from England) for advice on how to proceed with building my own, he recommended that I study violin making - that there were lots of good violin makers in England. I took his advice. Then, I returned to Canada, met Kenneth Gilbert, and was promptly offered a gorgeous Flemish-inspired instrument by Wm.Ross! So, I never did get around to making a harpsichord. But, now that I'm retired, and have fallen in love with Domenico Scarlatti, I decided to try for a really special sound compatible with his music.
The Instrument:
My Ross meets all professional needs - very stable in adjustment, exceptional carrying power, long sustain, and a clear and even sound that can be used for just about any of the repertoire. But, it was a single-strung Hitchcock spinet that had told me that the harpsichord was my instrument. I've always admired the gutsy power of Italian spinettas (and of most Renaissance instruments for that matter). And, when I play for myself, I nearly always use the Ross on 1x8. So, if I was to go to the work of building a harpsichord, it was going to be single-strung, with a historic sound very different from my Ross. The sound of the Flemish muselaar, the Italian harpsichord and spinetta, and the English bent-side spinet were each very popular in their day. But for Scarlatti, it should be an Italian/Spanish harpsichord.
The oldest unaltered harpsichord in the world, the Domenicus Pisarensis (Domenic born-in Pesaro) of 1533, kept at Leipzig University, is a single-strung Italian. Not only that, but it was built with the nut on the soundboard in such a way that it transitions from harpsichord in the bass to spinetta in the treble. What more could I ask for?
Well, a drawing or two, for one thing. All that I could find were a few photographs, from which the outside plan is reproducible but not much else. I am told that no one has examined the inside with anything like a fiber-optic camera through a jack slide, and that no X-ray photos have been taken.
The Plan:
The Pisarensis has a large keyboard for that time: nominally E-f'''. But, Scarlatti used GG-g'''. Even if I skipped GG# and f#''', which Scarlatti never used, I would have to add 9 strings. Could I do that while keeping the original sound?
First, I had to decide on its scale (length of c'', 523 Hz). You can't tell the scale of an early instrument from its keyboard because tunings weren't standardized.
The maximum scale is determined by the type of metal used for the strings. Three types of string were in use by 1600 - iron ('white wire'), yellow brass and red brass. Thanks to work done at the Smithsonian ("The Metallurgy of 17- and 18th-century music wire", M.Goodway and J.S.Odell, 1987), we know pretty well the properties of those three materials. The maximum scale for the usual Italian 0.25 mm wire was about 320 mm for iron, 240 for yellow brass. There are a number of historical reasons to suspect that really early Italian instruments were strung almost entirely in brass, that the widespread availability of reliable iron wire produced by a fining process probably developed at Westphalia during the late 1400's was responsible for the scaling changes introduced in Flanders in the mid 1500's and the conversion of most existing Italians to 2x8' a few decades later.
The minimum scale is determined by ear. The best sounding product of string mass and tension depends on the soundboard. Everything else equal, a light taut string (long scale) has truer high harmonics than an equivalent heavy slack string (short scale) for two reasons. First the rigidity of the string increases the pitch of high partials compared to low. A little bit of this effect gives life to a sound, but with too much the pitch loses focus. The rigidity effect is greatest with iron, less with yellow brass and lowest with red brass, which is why good makers continued to use brass for the lowest strings even when they used iron for most of the instrument - to balance the pitch focus across the instrument. Second, vibrations travel from one end of a slack string to the other more slowly than with a taut string, which produces a 'zinging' sound for some time after the pluck; being a tension non-linearity phenomena, this varies little with string material. Instruments with light bridges and quick direct-sound decay (Italian) can take shorter scales than those with heavy bridges and long sustain (northern).
When pitch is not standardized, of course, one need merely tune an instrument to where it sounds its best. But, being stuck with absolute pitch, as most people are who started playing a keyboard instrument before the age of 4, I have to get it right in advance. So, after checking with several expert maker/restorers, I settled on a scale of 240 mm, the scale for old brass wire. That meant that I had to add 5 strings at the top, 4 at the bottom of the original.
The oldest surviving strings from Italian instruments are most consistent with 0.25 mm wire on 2x8'. For single stringing, 0.28 mm seems a better diameter. I'll start with diameter scaling the usual (F*L)², tail strings red brass, and expect to adjust after it's built.
Extending the treble at the same scale as the original was no problem with a single jack row - just keep the plucking points and soundboard area functions smooth. The original had 3 strings on the bridge tail - rather than increase this to 7, I felt it better to reduce the scaling in the bottom octave a shade faster than the original to leave 6 strings on the tail, with the lengths of the first three the same as the original. As a practical measure, the keyboard is the same size as my Ross (159 mm/octave - the original is 169 mm), so the new instrument ends up 60 mm wider than the original. The string lengths, plucking ratios and string diameters work out to
| note | length | pluck | dia |
|---|---|---|---|
| g''' | * 85 | .47 | .28 |
| g'' | 160 | .42 | .28 |
| g' | 320 | .30 | .28 |
| g | 640 | .20 | .28 |
| G | 1195 | .13 | .32 |
| GG | 1576 | .11 | .60 |
| * short octave note | |||
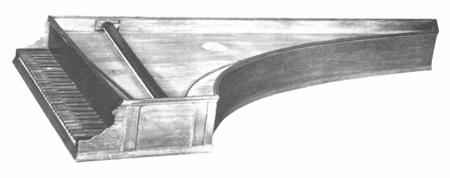
So, after a bit of time with a CAD program, I had an outside plan:

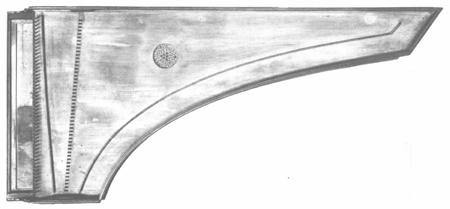
Hubbard gives a drawing of typical 17th century Italian interior construction:
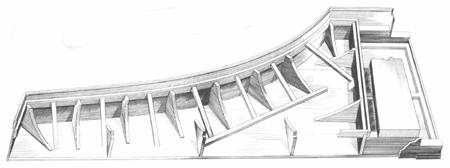
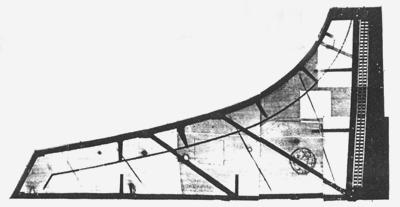
However, there has been a lot of good study of Italian harpsichords, particularly on the separation of 19th century fakes and 17th century rebuilds, since Hubbard wrote his book. It now seems that most early makers ran the grain of their knees vertically, not horizontally. The extra battens between the knees are mostly in instruments that were converted from single to double stringing. The bentside liner was usually kerfed.And, one X-ray of a 16th century instrument is now available, from the Hungarian National Museum of an instrument by Nicolo Fontana in 1571 (GSJ 44:55-70 1991). Holes in the soundboard show that it was originally 1x8,1x4. Note the lighter knees than Hubbard, and the very light soundboard barring. Although the GSJ article states that the soundboard has never been taken out, there are what look very much like three Flemish-style diagonal braces inside, in different workmanship from the knees. I suspect that they were added when the instrument was converted to 2x8, which means that the instrument was opened then.
The Wood:
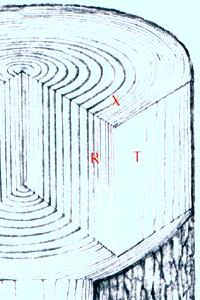 Since terminology for wood is so variable, I define mine here. I use "Identifying Wood" by R.Bruce Hoadley
to check wood species. The properties of wood are defined by three planes related to its growth: radial,
tangential and cross. I abbreviate dimensions by R, T and L: a dimension 1T means
1 mm measured on the tangential plane parallel to the X plane; 1R is 1 mm on the
radial plane parallel to the X plane; 1L is 1 mm perpendicular to the X plane,
lengthwise. All wood for a harpsichord should be clear and sawn with edges parallel to these planes for stability.
Since terminology for wood is so variable, I define mine here. I use "Identifying Wood" by R.Bruce Hoadley
to check wood species. The properties of wood are defined by three planes related to its growth: radial,
tangential and cross. I abbreviate dimensions by R, T and L: a dimension 1T means
1 mm measured on the tangential plane parallel to the X plane; 1R is 1 mm on the
radial plane parallel to the X plane; 1L is 1 mm perpendicular to the X plane,
lengthwise. All wood for a harpsichord should be clear and sawn with edges parallel to these planes for stability.
Three woods were used for most old harpsichord soundboards: alpine spruce (high-altitude grown Picea excelsa/abies) or various firs (Abies spp.) for northern instruments, Mediterranean cypress (Cupressus sempirvirens) for Italian. Grain orientation was always radial up, usually lengthwise perpendicular to the keyboard, but occasionally lengthwise perpendicular to the bridge (which makes the soundboard stiffer). Some early Italians, however, used other woods. 'Cedar' is listed as the wood of the Pisarensis - this term was used around the Mediterranean for any member of the genus Cedrus or Juniperus, although Cedrus libani and Juniperus excelsa are most likely.
All these woods, except fir, share a density that is high by softwood standards, a fairly low stiffness, and very low pitch content. (Schelling, in JASA 35:326-338 1963, argues for density divided by Young's modulus as a quality factor for violin wood.) Fir, and most North American spruces have much lower density/stiffness. However, three North American woods that grow to the required size are close to the European woods in basic properties:
| wood | species | density | stiffness |
|---|---|---|---|
| g/cm3 | 109dynes/cm2 | ||
| Alpine spruce | Picea abies | .45 | 100 |
| Mediterranean cypress | Cupressus sempervirens | .45 | 90? |
| Lebanon cedar | Cedrus libani | .46 | 100 |
| Alaskan yellow cedar | Chamaecyparis nootkatensis | .44 | 110 |
| Labrador black spruce | Picea mariana | .45 | 105 |
| Eastern hemlock | Tsuga canadensis | .42 | 100 |
I found almost no quantitative information on the aging of soundboard wood. Drying of wood is understood, but it takes much longer for the internal stresses in wood to settle out than just the time required to dry it. The advice in all the old books is just that the longer it has air dried and the freer of pitch it is, the better. The Mittenwald violin makers' guide was ten years air-drying for Alpine spruce. There are several old references to boiling fir, often in lye (soap), to remove pitch - this would also reduce stiffness, which is higher in firs than other woods used for soundboards, by a significant amount. From what I have read, it seems that cypress did not have to age as long as other woods. It also seems that it is inherently more stable, since many old instruments used it successfully non-quartersawn and have survived 400 years or more. But, I couldn't find a source of any large enough for a harpsichord, even though it is one of the commonest trees around the Mediterranean - all the large ones have been logged. I have read a few comments that yellow cedar works very well and is stable when young, but that its sound is poor until it has aged. Hemlock is recommended by several makers, but it splits very easily. Nobody knows anything about black spruce.
Italian sides are part of their soundboard and were usually made of the same wood. It seems that any handy softwood was used for Italian bottoms, knees, linings, braces and belly rails. It would be nice to use the same wood for the whole instrument for maximum stability - Ottawa winters are rough on wood structures.
Bridges and nuts are usually beech (Fagus silvatica) in northern instruments, frequently walnut (Juglans regia) in Italians. Wrestplanks were usually beech in Europe, oak in England, but North American rock maple (Acer saccharum) seems to work better and has been used ever since it became available. Beech was also usually used for Italian box slides, but red maple (Acer rubrum) is similar; both maples are easy to obtain locally.
Italian (and Ruckers) jacks were usually entirely of beech, Italians sometimes had walnut or yew bodies. (In the north, pearwood bodies and holly tongues were most often used.) The best makers in all traditions cut jack bodies with the radial surface on the short side, tangential on the long side. The long side is the one that has to fit precisely in the slide to control plectrum bite, and it seems that the tangential surface stays smoother than radial under wear. The usual cupping with humidity change with tangential-cut boards doesn't occur because jacks are so small. Partly for sentimental reasons, I used a small block of violin-maker's European maple I had that has air dried for 40 years. Old jack tongues were oriented radial surface front, I suspect to best hold the plectra. I used an equally old scrap of European beech for them.
The brass string wire, tuning pins and grain-oriented acetal for plectra are on hand, from The Instrument Workshop.
The Structure:
Musical instruments are like airplanes - they have to take large stresses with little weight. Early makers used trial and error to find the minimum required dimensions of their structures. Fortunately, with modern analysis methods, I can hope to get it right the first time.
A conventional wrestplank is a simple beam, supported at each end. If it bends too much under string tension, the jack slide jams (crushed gap). The maximum deflection ym for a rectangular beam width W depth D length L Young's modulus E under a uniformly distributed force U in the direction D is
ym = 5 L3 U / (32 E W D3)
The tension t of a string of length l frequency f diameter d density rho is
t = pi rho (l f d)²
so the force U due to n strings is n t .
The Pisarensis is supposed to have a wrestplank (presumably beech) about 40 mm high and 40 mm deep. It doesn't! The string tension, 50 strings of 240 mm scale 0.25 mm brass (U = 130 kg) would bend such a small wrestplank over 3 mm, and twist it as well. According to a note by Herr Jurisch of the Museum für Musikinstrumente der Universität Leipzig, a view through a tiny crack seems to show a 'counter soundboard' under the nut, half way between the soundboard and bottom board. This must in fact be a structural element supporting the wrestplank. If it were 10 mm thick cedar, extended from wrestplank to jackslide batten, and the three were well glued together, the combination would bend about 0.2 mm under string tension, a much more reasonable value. (Now do you see why I recommend Hubbard and Lee?) Given my 61 strings and wider plan, I planned to make this element 15 mm thick to keep the bending the same as the original probably has, and trenail it well so that the three pieces stay one unit.
The Jacks:
|
I find a small bandsaw by far the most valuable modern tool there is for making anything like
keyboards and jacks. It is worth while to
get one with a cutting height of 200 mm so you can resaw soundboards.
But, whatever size you get, fit it with a blade designed for wood, and don't get a blade
that is too thin and wobbly. Make a zero-clearance insert of wood for the table, learn
how to line up your machine properly, (not just the guides, cf. "Band Saw Handbook" by M.Duginske, 1989) and
you can quickly clamp up guides and stops to work to 0.1 mm in any wood, ready for the smoothing plane.
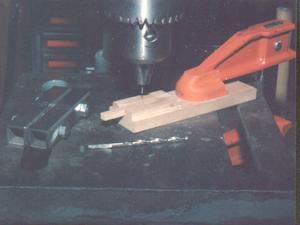
The jacks are an excellent place to start when building a harpsichord. You get used to the feel of working precisely with wood, but a goof costs little as long as you make a few spares at all stages. And, you get used to making things 61 at a time. Typical sizes for old Italian jacks I have measured are 12 mm wide, 4+ mm thick and 90 mm long. So, I began by truing my block of maple for the jack bodies to the proper grain orientation, 12.5Tx90L mm, cut 4.5R mm slices off it, then sawed two slits in the end of each slice 30 mm deep, of outside separation exactly the width of a good chisel for the tongue slot. I experimented with local felt until I found the best slot width for a damper (0.8 mm), stoned the edge of the cheap blade that came with the bandsaw so it cut a slot that width, then cut two more slits 10 mm deep for the dampers. Then I marked 35 mm off on the jack body, and cut the tongue slot out with chisel and mallet at 45°. After a week to let the stresses settle out of the wood, I planed each body to 4.3 mm thickness - the final thickness planing will be done after they are numbered to match the jack slide. My measurements of old tongues average 5 mm wide, 4 mm thick and 35 mm long. Old tongues are divided fairly precisely in three by the plectrum and the axle, that is the axle hole is 1/3 of the tongue length up from the bottom, the plectrum slot 2/3 of the way. These proportions are critical to the action - in particular, if the axle is too low, the repeat speed is slow and the top of the tongue tends to hit the adjacent string when it flies back from the reaction of the pluck. (Quite a few modern plastic jacks go wrong here.) Some 18th century makers fitted a bridle - a horizontal piece of wire behind the upper end of the tongue - to their jack bodies to limit kickback, but if the axle is high enough, a bridle isn't needed in my experience. I trued a block of beech 35L mm thick, cut 5R mm slices off that, then 4T mm pieces off the slices. The plectra slots in northern holly were made with a two-sided punch like a pair of rodent incisors, but this mashes up beech more than I'm happy with. However, I found that if I drill three 0.4 mm holes first, at the slot ends and center (see photo above) then tap a punch (ground from the shank of a drill using an aluminum oxide sandpaper drum) through the tongue with sharp blows of a light mallet, I get perfect results. I would never put up with a multi-register harpsichord without individual jack height adjustment screws - there is no other sensible way to regulate the plucking stagger accurately enough for good touch. However, a single strung instrument doesn't need them, and the jacks are quieter on the key felt without the small screw head contact. If a jack is overtrimmed in error, the early makers melted a bit of sealing wax onto the bottom of the jack to build it back up. The best place for a height adjustment to correct for weather changes on any instrument is a shim or screw adjustment under the key bed, not on each individual jack. |
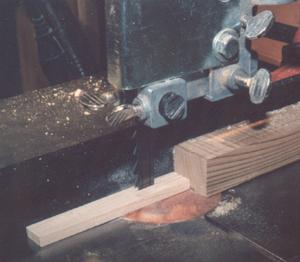
bandsaw: cutting jack tongue slots
|
|
The Jack Slide:
Most early jack slides were drilled and chiseled out of a single piece of wood - one slip and you have to start all over. I built mine of pieces in the traditional manner for spinets. The jack line of the Pisarensis slants relative to the strings - each jack is offset by 1.2 mm from the next so that they stay parallel to the strings. I trued strips of red maple to 13.25 mm thick, used a router bit to make a slot 12.7 mm wide, 4.3 mm deep along the length of one face for the jack bodies, then a 5 mm wide slot 3 mm deep offset by 1.2 mm the other face for the tongue of the adjacent jack, then cut the strips into 45 mm lengths. I considered gluing them in one go in a clamping form, but felt that there was too much chance of residual stresses that way, which would lead to future movement. So, I made a small waxed glueing jig to provide the 1.2 mm offset, glued pieces in pairs, gave them a day to relax, then trimmed for straightness and overall thickness. This was repeated for each pair, then group of four.... After I'm sure it's totally stable, it will be planed to final width. |
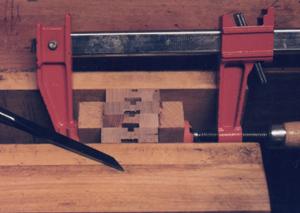
the jack slide alignment jig |
The Soundboard Rose:
 Soundboard roses were often prescribed by guild regulations rather than by the harpsichord maker,
in particular the Antwerp cast metal roses. Lots of very fine sounding old instruments have no rose.
Outside of guild regulations, roses were obviously viewed as an artistic device - some were made of layers
of ornately cut parchment leather glued together, others were elaborate one-piece wood carvings.
Soundboard roses were often prescribed by guild regulations rather than by the harpsichord maker,
in particular the Antwerp cast metal roses. Lots of very fine sounding old instruments have no rose.
Outside of guild regulations, roses were obviously viewed as an artistic device - some were made of layers
of ornately cut parchment leather glued together, others were elaborate one-piece wood carvings.
However, they can also serve an acoustical function. An air cavity with a hole in it has a resonant frequency, of roughly
It is in small instruments, therefore, where the volume-related soundboard resonance is high in frequency, where this resonance coupling should have the most acoustic value, where one might expect old makers to use roses acoustically. They don't seem to have done so. A number of old small clavichords provide a soundboard cavity air resonance roughly equal to the soundboard wood resonance, with a batten between soundboard and keyboard that makes an acoustic port of the appropriate area when the instrument is placed on a table. But, the equivalent structure of Flemish harpsichords, the belly rails, were always made to resonate at a frequency much lower than that of the soundboard (typically 70 Hz vs. 120 Hz.) The greatest care with old roses was taken in small spinets, but I know of no study relating rose resonance vs. soundboard resonance for old harpsichords or spinets.
Anyway, I wanted one. I built it up of turned wood pieces and used the natural contrast between black walnut heartwood and sapwood in the design. I'll make the soundboard so that the rose glues in from above, and test various acoustic impedances in the rose hole before I do.
The Nameboard:
The nameboard is what you see at the keyboard every day, so pick an appearance you want to live with! The upper section is fastened to the wrestplank, a lower section covers the gap between the fixed board and keyboard, and is removable to permit the keyboard to be withdrawn for repair. It usually identifies the maker and where the instrument was made. Flemish makers used brilliant white, black and red block printed paper covered with designs and mottos on the nameboard, and often restricted their maker's identification to initials on the soundboard rose. I plan a graphic design for the board based on the history of western European musical notation.

I show my planned design here (in three rows to fit Web resolution - the actual design is one long strip). From left to right, the top row is 9th century neumes, 11th century (Winchester Troper), 12th century Italian, 12th century English; 2nd row 13th century (Sarum Antiphoner), 1530 (John Taverner), 1607 Monteverdi's Orfeo (the first printed score), 1659 (Christopher Simpson); 3rd row 1689 (Musick's Hand-Maid, Henry Purcell), 1705 French (Gaspard Le Roux), 1750 Spanish (Domenico Scarlatti), 1888 German (Chrysander edition of François Couperin).
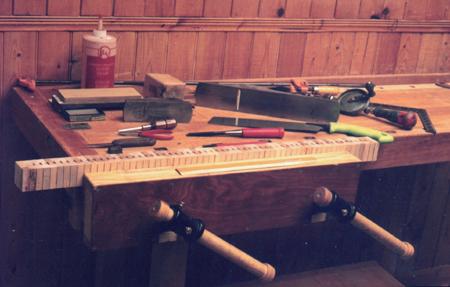
The Tools:
Having grown up with hand tools, I still prefer them for most things. A solid workbench with a good vise and bench stops, sharp pencils and accurate rule, a fine-toothed saw, chisel and mallet, block plane and try plane, a small hand drill, a fine sharpening stone and good clamps are all you really need to make a harpsichord.
And, good glue. You do know, I trust, not to use common white glue for anything good! Yellow carpenters' glue is more permanent, but I use a polyvinyl acetate glue that should be as permanent as the traditional hot fish glue without fish glue's disadvantage of weakening under summer humidity and heat. Fish glue is still valuable for delicate joints that must be taken apart later for repair, such as violins, although PVA glue softens enough at just short of scorching heat to separate most joints. However, you are unlikely to move any glue joints I make - I trenail them with 3 mm hardwood the way the Ruckers did to ensure they won't move even if the glue softens.
Modern sandpaper is very useful for shaping small parts such as rack guides and jack slots - I glue it to hardwood scraps with standard wood glue to make files of whatever exact size and bite is best for the job at hand.
Postscript:
I've decided that I am unlikely to succeed in making an instrument that matches my expectations. It's
probably unattainable to match dreams in hard reality. Besides, I was totally put off by the astonishingly rude
hostility of professional makers on HPSCHD-L. So, this note is a history of part of
the research required to build an original harpsichord, and will not be continued.
In 2006, Museum für Musikinstrumente der Universität Leipzig prepared
drawings that are now publicly available. However, they are described as "after the instrument" rather than
"of the instrument". Use them with caution.