Finishing Solid Pine

I make things of solid pine because I love the feel and smell of it. Pine lasts a long time - there is lots of 200 year old pine furniture in Ontario that is still in perfect condition despite our climate. And, it can be finished to match any decor, from blonde Scandinavian to ebonized 19th century. There are lots of books on how to construct fine pine furniture. But, there is almost nothing around on how to finish it, other than to just slap clear varnish or paint on it.

The best book that I have found on wood finishing (non-paint) is by Bob Flexner, "Understanding Wood Finishing" (Rodale Press). It gets more things right than any book I have ever read on the subject. If you love woodworking, get it. But, it advises to just use clear varnish or paint on pine!

I usually use 2x18 cm ("1x8") furniture grade eastern white pine. At $20/m² Canadian, it's one of the cheapest quality woods around, with lots of nice grain swirls and iridescent knots. I pick out a few of the most knot-free boards and resaw them to 1 cm thickness for backs, leaving the more interesting looking pieces for parts that are seen the most. Most of the scraps are glued up for turning into bowls and vases.

As any cabinetmaking book will tell you, wood moves. When building up a large surface by edge-gluing, choose your boards so that, when they are glued up, the grain curves mechanically balance each other. Design your furniture structure so that all surfaces in the same plane have the grain running the same way, to minimize stress from seasonal change. I prefer hardwood dowels for reliability where grain must join at right angles, rather than tenons which tend to fracture at corners. Pine is weaker and more flexible across the grain than most hardwoods, so ensure the design of your structure takes that into account. And, of course, you will choose your boards so that the appearance of the most visible parts of your work is as visually balanced and attractive as possible. But all this is well covered in books. On to what isn't.

Finish materials

In a finishing store, physical chemists have a fit with the names used for things! True oils are liquids, the stuff that drips out of your car onto your driveway - the last thing you want around fine wood. What you want are lacquers or varnishes. A lacquer is a solid, dissolved in a solvent that evaporates after application, that can be re-dissolved by a solvent at any time. A varnish is a material that changes to a solid after application, so any solvent or thinner used for its application won't dissolve the cured finish.

Shellac is a lacquer. It's food safe - in fact it's used for candy coatings. It can be refined and dewaxed (blonde), just refined (orange) or raw ('button lac'). The Cremona violin makers used orange shellac (Stradivarius added orange dye to accentuate the colour), as did most early cabinetmakers in Ontario - it lasts hundreds of years if looked after. It's cheap, seals wood well against humidity changes, is easy to apply with a brush, repairs easily, and takes a polish beyond compare. However, if you are making a table top, shellac is not the material to use - it re-dissolves in alcohol (beer/wine spills), whitens irreversibly with moderate heat (hot food), and melts with high heat. And it's not as environmentally friendly a product as it once was - it is now collected by stripping the bark from the East Asian trees on which lac bugs (Coccus lacca, a scale insect) live and shipping it off to be dissolved in industrial solvents, instead of being scraped renewably off the bark every few years and dissolved in local grain alcohol as it used to be.

Tung oil is a varnish. Squeezed from tung nuts (Aleurites fordii), a renewable resource, it oxidizes on exposure to air and becomes a solid resin by polymerization. It has been used for at least a millennium in China in its raw state - it lasts a long time. Like shellac it seals wood well against humidity changes, is easy to apply with a brush, and repairs easily. It brings out the natural colour of wood better than shellac. But, it's more expensive, requires more coats, and is harder to put a fine polish on. The raw oil contains toxins (don't drink it!) but these are destroyed by the drying process - the finish is FDA-rated food-safe.

Linseed oil, from flax seeds, is also a varnish - our ancestors used it for farm implements, not fine furniture, and that's where it belongs. There are many excellent modern nitrocellulose lacquers, and varnishes made from phenolic, alkyd and urethane resins, but they require solvents that can cause too many health problems for my liking. Water-based coalescing varnishes are health safe, but difficult to apply so they stay clear, don't bring out the figure of pine as well as tung oil, and don't seal wood well against humidity changes either. However, they do take a good polish if applied thick, scraped smooth, then polished with a buffer loaded with rottenstone.

A dye is a colourful molecule dissolved in a solvent - transparent, so wood shows through it. In paint stores, 'stain' means pigment, chunks of coloured material that block the view of wood it is applied to. As a wood lover, I stick to dyes. Unfortunately, almost no one uses dyes for finishing wood any more, in fact most paint store people don't even know what you mean by the term! The most widely used wood dyes are aniline. They dissolve in water, are available in every colour of the rainbow, and revolutionized furniture finishing in the past century when they were developed. My favourite anilines are a gray mix with the calm character of antique pine and a black mix of colour similar to the solid walnut furniture made here before the big trees were all cut down. (Lee Valley carries them.) Curiously, shellac (orange or button lac) under tung migrates through the tung and leaves the finish a bit sticky; I don't recommend it.

Staining

I work surfaces flat and square with a plane, then sand with 320 grit garnet paper and a small-orbit finishing sander. My aim in sanding pine after planing it is not to smooth the surface, it's the opposite - to roughen it as finely and evenly as possible so that stain applies evenly. If you skimp on sanding, stains will blotch on pine - you will get highly-stained patches that are not visually related to the grain pattern. If you are going to use tung oil, round ('break') edges a bit more than you would normally. Tung climbs up on edges as it dries, a useful trait to strengthen the finish at exposed points, but one which should be prepared for.

Pine is so absorbent that it is easy to overstain it. In fact, it's next to impossible to keep end grain from getting overstained - it's easiest to design your furniture so it looks good that way. I get best results on pine from mixing aniline stain extremely dilute - 5 ml powder in a liter of water, about 1/20th the concentration marked on the packets. I begin by heating the stain mix to hand-hot, to reduce blotching caused by traces of oil and resin in the pine. Then I pre-wet exposed end grain with plain water, apply a wash of stain over the entire surface, and rub in a bit of extra plain water immediately on areas that look too dark. Applying water this generously makes the surface of the wood expand, so to keep everything true I apply stain to all surfaces, inside and out, so the wood stays in balance. 'Grain raising' is minimal when the surface of the wood is sufficiently finely notched up by sanding - the grain is actually raised everywhere, but so evenly and in such short tufts that it is bridged over by the finish.

Let it dry a full day, then look it over. The beauty of dye is that you can move it after it's in place - apply extra water to lighten, extra stain to darken, different stain mix to blend colours. Practise doing this on scrap pieces until you get the knack of feathering the edge of such corrections so they don't show - I find a small brush moistened with boiling water handy for this. Once it looks the way you want it, let it dry until the surface is totally dry, crisp to the touch - at least three days in dry weather, more in humid. Otherwise, your finish can move the stain around.

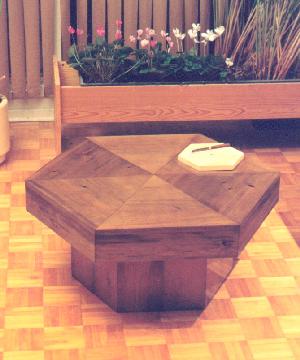
coffee table & cheese board. table: 'walnut' stain, tung oil. board: blonde shellac.

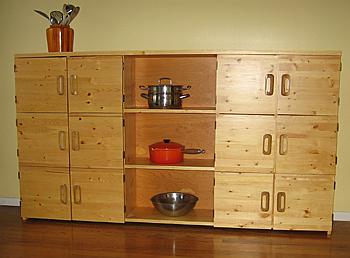
sideboard. prejoined lodgepole pine, tung oil.

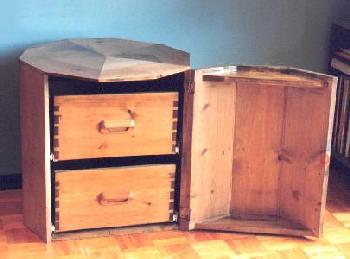
display pedestal & file cabinet. 'antique grey' stain, tung oil.

tea table. yellow shellac, tung oil - not recommended now.

computer workstation. dark 'walnut' stain, tung oil.
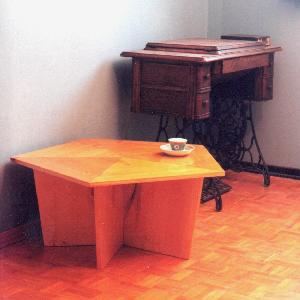
Finishing

You can find directions on applying shellac and French polishing it in any book. Tung oil experience is more difficult to come by - commercial finishers don't use it because it's too expensive and far too time-consuming for them. But, if you have read this far, you probably make furniture because you enjoy it, as a luxury. As my grandmother put it, "Never skimp on a luxury because then it isn't one." (That's her WW1 sewing machine in the background of the tea table photo.) Add up the time you've expended on that furniture, then multiply by minimum wage. That puts an extra $10 spent on varnish in perspective, for me anyway. Pure tung oil, particularly when heat-polymerized, is a joy to use, and a superb practical performer on furniture that gets used.

First, however, a warning is needed: there is zero 'truth in advertising' in the finish industry. Absolutely anything can contain absolutely anything, no matter what the label says. There are products out there labelled tung oil that don't have any tung oil whatsoever in them. Many 'tung oil' products depend mostly on phenolic resins. And as if that isn't enough, product formulations change without warning (and in at least one case I can personally attest to, complete with denials that they have.) You just have to buy from a reliable store who will help you to find a good product, especially when a formerly trustworthy product changes for the worse.

Natural tung oil is slow curing, and does not cure very hard, so it is best used when a thin matt varnish film is desired and the surface is not subject to heavy wear - it's great for pine walls and ceilings. Heat-treating ('polymerizing') tung oil solves all these problems - the final finish is almost as tough as urethane, dries almost as fast, bonds better and polishes better. There is only one drawback of polymerization - the oil is thickened so much that a thinner is required for application. Use something sold as a paint thinner for this - products with names like Varsol or Westersol are designed to clean things, not to thin varnish. I wish I could tell you how to pick a thinner that has minimal amounts of the really dangerous solvent fractions such as benzene or xylene, but no label will tell you, and there is no simple test to find out. If you start feeling dizzy or get headaches despite providing good ventilation, change brand, fast. Lay low on alcoholic beverages while you are using such solvents - alcohol is an organic solvent too and will increase the chance of health problems.

Tung sealer mix is available that has wetting and drying agents added to it. I find that new pine is so absorbent that this mix soaks in too much to seal. What does work well, if you have time, is to use natural (unthinned, non-polymerized) oil for sealing. Brush it on, wait 5 minutes, wipe off excess. Repeat a week later, then let dry for 2-3 weeks. Otherwise just thin your polymerized) oil 5% or so for the first coat. (Some experts thin more; extra thinning does no harm to tung, it just takes longer to dry,)

Tung can be applied by rubbing only on dense hardwoods, but pine needs more oil than rubbing provides. So, begin by soaking all pine surfaces with oil, excepting only those that will guide sliding movement, such as the runners of drawers. (Rub warm paraffin wax on them.) A major value of finishing wood is to reduce movement due to changes in humidity - all surfaces have to be sealed against water vapour to accomplish this. From then on, apply tung oil like the books tell you to apply varnish. Lay it on a horizontal surface, brush it out evenly, then 'tip' it - wipe the brush dry against an edge, then draw the bristle tips smoothly along the grain to remove excess film thickness. Always varnish so you can see the reflection of a light off the surface as you work, to ensure that your film is even. Wipe adjacent edges with absorbent paper towel to remove runover. If bubbles remain in the film when it dries, add more thinner. Applied properly, polymerized tung oil is sag-free in 4 hours and tack-free in 24, so 2 days suffices to cover all planes of a piece of furniture. (Wrap your brush tightly in aluminum foil and keep it in a freezer between sessions to reduce solvent use - tung oil stays uncured for several weeks this way.)

Let the second coat dry several days, then inspect it. End grain, knots, and some soft spots will be insufficiently sealed (matt looking) - add another coat there. (Feather the edges of course, to minimize later sanding.) It's tempting to apply a lot of oil to end grain in the hope that the wood will get sealed and the job finished faster. My tests show that to be counter-productive. Tung oil has to oxidize in order to cure. If you add a lot of oil at one time to areas where it soaks in, it takes longer to dry all the way through than if you add the same amount of oil in half a dozen normal layers a day apart. When I soaked some new pine endgrain for 15 minutes nonstop, then left it to dry, a saw cut revealed uncured oil on the inside a full month later.

Go over remaining rough spots with fine sandpaper. I prefer 280 grit open coat aluminum oxide for sanding tung - it doesn't break off chips as garnets do, doesn't leave metal splinters around the way steel wool does, and can be kept clean as you go with a soft brush to prevent clogging. (Wet sanding works well too, but I find with modern open coat papers that water isn't necessary.) Now is also a useful time to compensate for the overstaining of end grain that is inevitable with pine - sand the sealed surface until you start breaking through into the unstained wood, moisten the surface with oil to check colour, and continue sanding until the shade is the way you want it.

Now, take a look at the overall colour of your work. Cured tung often has an amber cast - it absorbs blue light more than green or red - and heat-treated tung often takes on a greenish tinge on pine, under fluorescent light in particular. If it does, and you don't like it (I don't, I love gold), you need to add a dye to it to absorb more green - blue to make the colour more neutral, red to make it warmer. Stable oil-soluble dyes (MEK base liquids, Valifast, Neozapon) are available, but I have so far only found intense colour assortments designed for electric guitar makers and the like available retail. Aniline dyes can be made so that they are oil soluble, but for some reason they are then not stable in colour. So far, I have used Pratt&Lambert Cherry Bark Tonetic Stain (#D7441) - it contains a bit of brown pigment, but not very much, along with a stable red dye. I find that about 2 ml of it in a liter of tung oil takes a useful amount of green out without affecting gloss or drying. Check on a test piece, of course, until you get it right for you.

Then, just keep adding layers and sanding them off until the surface is as level as you want it to be - as many as a dozen coats for a real mirror finish. I use a firm rubber block to back the sandpaper for levelling - if the paper clogs despite brushing, the coat isn't dry enough, so wait some more. I sand the next-to-last coat lightly and evenly with 600 grit water paper, without a block but with water. Use pure oil with no pigment as the final coat, for maximum hardness.

Now is why no commercial shop can use tung oil: wait a full month - two months is better. Only then will tung be hard enough to 'finish the finish'. (You can use the furniture in the meantime, though - a commercial place can't. Just use a cloth cover or place mats to keep things like glossy magazines from sticking to the surface while it is still soft and plastic-smooth.) Soak a pad of cheesecloth with water, pick up some rottenstone with it, and rub in circles until the surface has a perfectly even glowing gloss, not the plastic-like gloss of an unrubbed varnish. Rottenstone cuts tung very slowly, so this takes time - a power buffer should be useful if you have one. Wash everything off, then invite in your admiring friends. You are done.

The best continuing care product for your finish is paste wax. Skip the kinds that contain silicones - you'll never be able to repair tung finish with them around. Clean the surface with a cloth moistened with paint thinner. Put a lump of wax into the center of a piece of clean cheesecloth andwipe the surface, applying just enough wax to see the sheen change. Let the wax dry until the surface just starts to dull, then rub hard with a clean cloth. You'll remove virtually all the old wax this way, so it won't build up. Repeat when the finish looks dull or dirty - once a year is adequate for furniture in most households because paste wax does not evaporate as liquid polishes do.

Counter Tops

Kitchen counter tops of natural wood pose special finishing problems. There are reasons for the popularity of melamine! The surface must be perfectly sealed against moisture to avoid staining by food and to avoid buildup of moisture that would permit toxic mould growth. The finish has to be sufficiently tough to withstand daily scrubbing, and must be continuously renewed whenever it gets too thin. But, most importantly, oils that could support microorganism growth must be totally prevented from soaking in. If you prepare raw chicken on a salad bowl type finish, you are risking your life.

Polymerized tung oil works! Simply renew the finish often enough that the surface stays perfectly sealed - a once-a-month rub with an oil-soaked cloth is about right, with overnight to dry. Tung is excellent for this because it bonds naturally to old layers, unlike urethanes and most other synthetic finishes.

Pine - there's no wood like it!

John Sankey
other notes on wood working