A number of riders have made the change from the stock electrical pump to a vacuum pump.
The vacuum pump is used in ultralights and snowmobiles, thus it is more than reliable for our bike applications.
There are two pumps that have been used; the smaller Mikuni DF44-211 (14 L/h) and the larger Mikuni DF52-136 (31 L/h).
See http://www.mikuni.com/pdf/fuel_pumps.pdf for pics of the various models and info.
The larger pump has duel fuel outlets; for our application one of the outlets must be plugged.
I have been using the this setup for about two years without any problems, even
at full throttle when using the reserve on the tank.
My installation recommendations:
1. As the vacuum pulse decreases distance between the pump and the carburetor increases, the distance between these two should be minimized.
I would recommend no longer than 1-foot for the smaller pump.
2. Use thick-walled tubing for the vacuum line in order to minimize collapse and maintain a strong pulse.
3. The vent should face down as this minimizes problems with condensation or
in the event that the diaphragm leaks.
4. To minimize vapour lock, place the pump in an area where it is cooled by
flowing air.
The following details my installation:
1. First remove the original pump, bracket, fuel filter and lines.
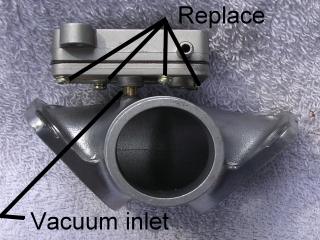
2. On the vacuum pump, remove the 4 screws on top and replace with same size bolts (Figure 1).
This is only important for this installation, as the screws cannot be removed to service the pump once the pump is in place.
3. Remove the manifold (I have a Nemesis).
4. On the Nemesis there is a flat spot corresponding to where the vacuum nipple is on the stock manifold.
At this spot I drilled a hole through the manifold the same size as the inside diameter of the vacuum nipple on the pump.
Figure 1:
NOTE: On the stock manifold: 1) the vacuum nipple on the pump must be removed; or 2) the vacuum nipple on the manifold must be removed; or 3) a short piece of rubber tubing could join the two nipples (test to see if this will fit when the manifold is mounted).
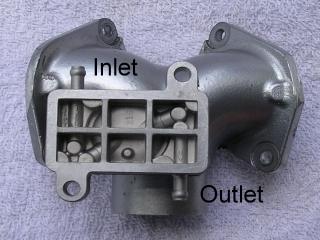
5. Enlarged the same hole by drilling with a bit just a little smaller than the outside diameter of the largest part of the vacuum nipple. All the nipples on the pump bulge out near the ends (Figure 2).
DO NOT drill all the way through the manifold; drill only about ¾ of the way down the original hole.
Figure 2:
6. Sand the bulge on the vacuum nipple on the pump until it fits snugly into the manifold.
DO NOT over sand otherwise the fit will be loose.
7. Smear the vacuum nipple from the bulge back to the pump body with JB Weld
(or other brand of your choice), making sure to not to get any JB Weld from the bulge to the end of the nipple so that the hole in the nipple does not become blocked with JB Weld. Insert the nipple into manifold until it bottoms. Smooth any excess JB Weld around the nipple/manifold joint.
8. Orientate the pump as shown if Figure 2.
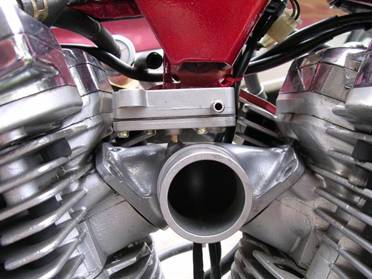
9. Install manifold on the bike (Figure 3). Note the close tolerances and proximity to the engine; however, there is airflow around the pump.
Figure 3:
10. The original fuel filter can be used. I replaced it with a small clear snowmobile filter that has the same size inlet/outlet as the pump.
11. I used ¼” fuel line for all connections rather than the stock 5/16”. It will be a tight fit to connect to the carburetor and petcock, but the smaller line does fit.
12. Connecting the fuel line to the pump inlet is also very difficult because of the tight quarters and awkward angle.
I recommend the line be put on before the manifold is put into the engine.