
| The standard dish set these days is made of stoneware, and has a place setting of a dinner plate, a lunch plate, a cereal bowl, and a mug. A set for eight costs as little as $60 - mine are made in China for Stokes. But, if you are old fashioned and want small side plates for rolls or bread, or small bowls for fruit or dessert, they don't exist except in china patterns that cost as much for a single piece as a whole set of stoneware. |
|
|
One option obvious to an inveterate do-it-yourselfer: make your own!
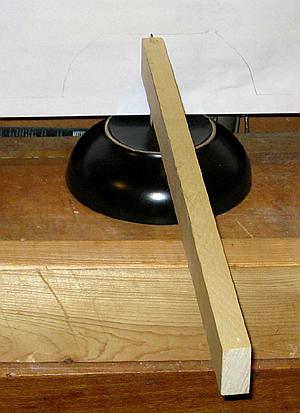
I made mine at the Gloucester Pottery School. Most cities will have a similar guild or workshop, but if you are in Ottawa, I recommend the G.P.S. It's non-profit, run by volunteers, is well set up with all the equipment you'll need, and has excellent instructors to get you started. I signed up for an eight week course. Although my orignals were probably made with a mold and die (jiggered), I hand threw the few I need. The original red was obviously hand painted; so mine can match them. First, decide what pieces you want, then make templates for the inside and outside shapes of any that you want a set of. I started with profiles of my existing bowls made with a tracing jig (made from a 1x2, nail and pencil; the back support keeps the jig at a constant angle). A reducing copier is handy to reduce the results to any size desired. Clay contracts during firing, so the templates must be 1.14 times the desired final size of the bowls. Once you are expert, you may consider skipping templates. However, they can be unexpectedly useful years later when a piece of a set gets broken. 1/8" birch plywood, a coping saw and fine rasp make excellent templates. Cardboard doesn't work, as the templates inevitably get soaked with water during use on a wheel and disintegrate. |

|
| Aligning the templates shows the thickness. 5 mm is about the minimum, especially for beginners like me. The supports of the inside template are made wider than the outside of the bowl because it is used before the outside is trimmed. | 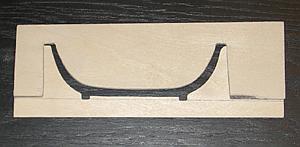
|
| Pottery starts with clay. At the G.P.S. the standard clay is a white porcelain, Tucker 6-50, fired to cone 6 (1230°C) in electric kilns. It comes in 5 kg 'pugs' ready for throwing. One was ample to make me eight bread plates and eight fruit bowls. (It's essential for a matched set to be made from one batch of clay, as different batches will contract differently during firing.) | 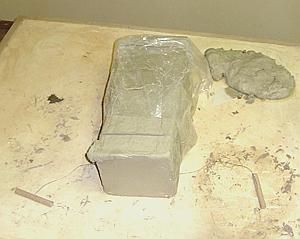
|
| Mould a suitable sized piece of clay into a ball, then press it firmly down at the center of a moistened potter's wheel. Keep a sponge and water within easy reach to keep hands and clay slippery. | 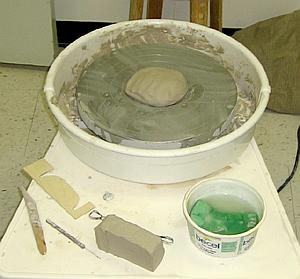
|
|
Work the clay into a cone with both hands on the outside, to center it on the
wheel and to ensure that the clay is all moving evenly. If it feels stiff and
doesn't flow, it needs more water; if it feels sticky, it needs to stand open
to the air for a while to dry. It's best to anchor one hand firmly against your
body and use the heel of that hand - this helps to center the clay. Shaping is
done on the side opposite the heel hand so pressure is always on the hand heel,
which is steady.
The instant the clay moves off center, stop shaping and get it centered again. If you feel a spiral forming, it means you are applying too much rotational force - reflatten the clay and start over with more water on your hands and use less pressure. Flatten the clay to the width of the bowl by pressing with one hand on the top while keeping it centered with the other. Unless making a small simple piece, repeat this process - some do it three times, others cut the clay off the wheel, invert it, then repeat. Clay is made of flat particles (platelets) and they must be aligned along all surfaces or the piece will contract too much when drying and crack. Clay must flow. Learning the feel of flowing clay is your first task as a potter. A center hole is made with a thumb and opened to the inside bottom diameter of the bowl. Using one hand heel on the outside, and the fingers of the other on the inside, persuade the clay to take up roughly the shape of the final bowl. This must be done slowly enough that the clay platelets are aligned horizontally rather than in a spiral. The walls are best made a bit thicker and higher than the final product; the excess will be removed during trimming. (The more expert the thrower, the less they need to trim.) Shape the underside with a wooden knife. Avoid using fingers on the underside: the silica in clay is a potent abrasive and the clay-coated wheel surface will quickly eat through finger nails. | 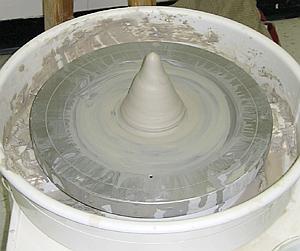
|
| Remove the bowl from the wheel by cutting it off with a stretched wire held flush with the wheel surface, then transfer it to a batt using eight fingers spread evenly under the edge. (Some potters make everything on batts that fit their wheel to avoid the potential for warping during this step.) Then clean everything up carefully with wet sponge and wet mop. Clay contains fine silica particles that pose no health hazard when wet, but can be breathed in when dry and damage your lungs. Wash all clothing while wet for the same reason. Put surplus clay into a recycle barrel for reuse, with enough water to keep it moist - clay will clog drains if washed off in a sink. | 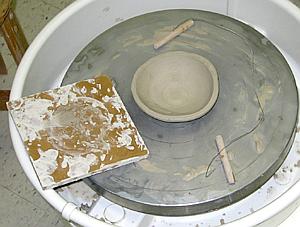
|
|
Wrap the bowl loosely in plastic, or cover it with a suitable sized
plastic container such as used for yogurt, and leave it a few days for
the clay to gel and dry a little. If dried uncovered, thin parts will
dry more than thick, which will cause difficulties both with trimming
and with distortion or even cracking.
If a finger pressed on the clay changes the bowl shape, it is far too wet for trimming - wait a day. If a thumbnail leaves no impression, it is too dry for easy trimming; it should be moistened with a water spray and left covered for a few hours or more for moisture to work in. The right dryness is often called "leather hard". The more skilled the trimmer, the sharper their tools and the harder the clay is when they trim. Chinese master trimmers in Jingdezhen wait to trim their pieces until totally air-dry, and produce the finest and thinnest porcelain in the world. | 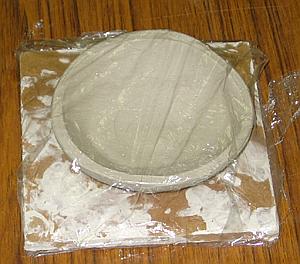
|
|
The Chinese tradition is that the trimming should go from the foot to
the rim and from the outside to the inside, whether the piece is an
open or closed form. These pictures show the opposite, the way I was
taught. However, increasingly I follow the Chinese route.
Moisten the bottom of the bowl and the wheel, then place the bowl at the center of the wheel. Rotate the wheel slowly; the edge of the bowl will move slowly towards and away from a reference finger held close. When it is closest, stop the wheel, then slide the bowl a bit away from the reference finger. Repeat until it is centered as well as its shape permits, then press the center of the bowl firmly down on the wheel to lock it in place. | 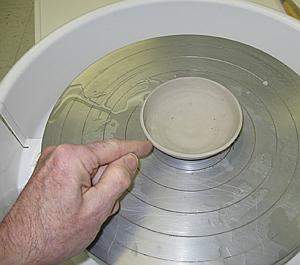
|
| First, center the inside and outside by trimming off eccentricities. Then, trim the edge and inside of the bowl until it matches the inside template, while keeping an eye on the outside to ensure that the piece isn't made too thin. Trim the top outside to thickness for proper thickness; it will be covered by clay while the foot and the rest of the outside are trimmed. Go over the bowl with a sponge just moist enough to leave a smooth sheen on the surface and edges smoothly rounded. | 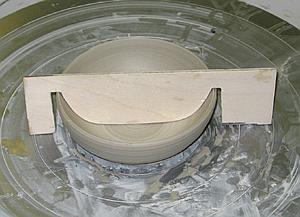
|
|
Turn the bowl over, repeat the centering process, then lock it down with
three lumps of wet clay stuck to the wheel. Trim the rest of the outside
until it matches the template.
After drying, the bowl is ready for its first firing in a kiln, to 'bisque' at about 950°C. | 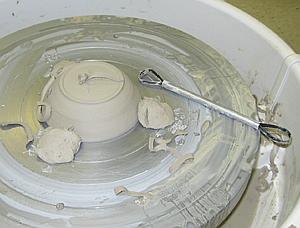
|
| Go over the fired bowl with 120 grit aluminum oxide sandpaper to remove surface irregularities, evenly round edges, and polish the surface. Flatten the base using a sheet of sandpaper on a solid flat surface. Brush all bowl surfaces well to remove embedded dust and vacuum up all the dust that results. Wear a dust mask for this phase. | 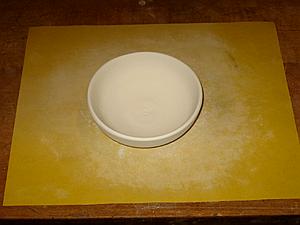
|
|
Some apply wax emulsion to the sides and bottom of the foot as at right, to prevent glaze
from being applied where it would stick to the kiln during final firing. It's easiest
applied on a slowly rotating wheel, sometimes called a banding wheel; at home I use an
old 33 rpm phonograph. However, I now fire everything on
stilts, so can glaze the entire piece.
Now the bowl is ready for glazing. | 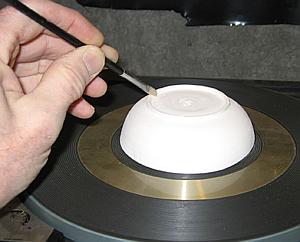
|
|
Here is a closeup of the red glaze, at about 100x magnification. It's overlaid on the black
and is fired so that it beads but still adheres perfectly. The quiet gloss is the same
over red and black, so I suspect an overglaze was used. The combination withstands every
functional test
I threw at it.
I began by trying commercial underglazes and clear overglaze. The first overglaze I tried wasn't clear, and all others I tried were incompatible with the underglazes or didn't seal the surface unless they were applied too thick for the appearance I wanted. So, I learned how to mix my own. | 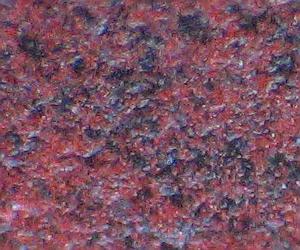
|
|
I began by trying a glaze that might be a
matt black to match my plates. It was a fascinating glaze to understand, but didn't
have the look I wanted. So, I adopted the usual research strategy of taking a side
step to try to find a glaze that expressed the look I wanted in pottery other than
my bowls and plates. And, as so often happens (which is why it's a standard research
technique), on the way I tried a green glaze that solved my
overglaze problem. It could be applied very thinly, had a soft gloss and,
with colorant removed,
turned out to be perfectly clear and compatible with the underglazes I already had.
But something else happened - I fell in love with the earthy natural look of iron glazes. And so, I'm starting to make my own dinner set from scratch, with all the pieces I want. Here are some of them. | 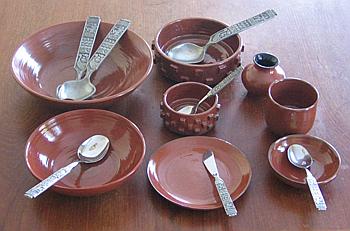
|
