Pinhole Cameras and Trees
Lots of people are happy to tell you how to punch a hole in a box to make a pinhole camera from a paint can or cereal box - just issue the command "pinhole camera" to your favourite search engine. The sharpest picture possible is with a hole about 1/10000th the distance from the pinhole to the film. (If light truly traveled in straight lines, the smaller the hole the sharper the picture would be. But, light doesn't travel in straight lines - it bends, or diffracts, as it passes close to things.) However, most people make a larger hole to reduce exposure time, and to make it easier to make the hole. Kodak recommends f./300, for an exposure time of 2 minutes in full sun with their photographic paper. The sharpest pinhole would require an hour.
Why bother with a pinhole camera? Well, there are advantages to be obtained from long exposure times. Flowing water takes on a unique, silvery, look. The edges of shadows are softened, but not their central darkness, because the sun moves during an exposure of an hour. On a breezy day, trees take on a neat impressionistic look that separates them from rock-solid buildings. People vanish from crowded city scenes because they move. A soft-focus photo made by a pinhole camera impels a viewer to complete it with their own thoughts. And, it's a fun simple project for all ages to make one.
But, most of all, pinholes offer otherwise unobtainable options of geometry and perspective. A pinhole camera film plane can be made any shape: slanted, polygonal (the three sides of a cube opposite a corner pinhole, say), curved (for panoramic photos)... There are lots of neat ways to project the world around you other than square on.
Tree huggers face a special problem of geometry. A tree can be 50 m high, but be surrounded by so many other trees that a photo is possible only from 25 m away - a vertical angle of 64°. A 28 mm lens on a 35 mm camera covers 64°, but has to be angled up 32° to get a photo of all the tree - not exactly effective as a photo. And, useless for measuring trunk profile and crown area - for that the film plane has to be parallel to the tree trunk, as in 'the big picture' at right.
A pinhole camera does the job easily.
Every wide-angle camera has a problem with light fall-off at the extreme angles. The second drawing shows why. Light intensity depends on distance from the source - distance A is much less than distance B, so even if the camera is looking at a white sheet, the light from the lens will be brighter at A than at B. Not only that, but if the lens is vertical, the view B has of the aperture is at such a slant that it appears to have a smaller area, reducing the light at B still further. With lenses, you need elements (and dollars) galore, or graded coatings, to correct this problem. But, with a pinhole camera there is a simple solution - slant the pinhole so that it is A that sees the small pinhole and B that sees it full size. A 64° camera works.
There is nothing special about 64° of course, just that the larger the angle, the greater will be the difference between the top, bottom, and middle exposure. A smaller angle is easier. The wider the angle, the more perfect the pinhole must be. In particular, it must be a true hole, not a tube! Fortunately, 1 thou brass shim stock is available at many hobby shops (and all machinists' supply outlets) and can be punctured with a finely-sharpened needle.
The only paper I could obtain without a huge minimum order is called vari-contrast - the contrast depends upon the colour of the light. Not what you want when faced with coloured objects! If you can get it, use the lowest constant-contrast paper available - contrast can always be increased with an image processing program, but information lost in highlights and shadows can never be recovered. Of course, a good image processing program (which I don't have) would be able to apply a vertical brightness function to cancel out the inherent variation of a camera - probably more than 64° is possible that way.
The camera at right served double duty - my son Michael first made it as an art class project. It is its own tripod - any level surface will do for up, down, right or left photos. The film back is held on by an elastic band around two of the dowels. Minimalist, and all that.
You need to carry a light-tight bag to change paper in the camera out in the field, and to measure each trunk diameter at the base to scale the photos. (And, keep track of which sheet of photographic paper is which!) The photo at right was converted from a negative image by computer software, but this is not necessary if your interest is measuring trees.
the big picture
the pinhole geometry
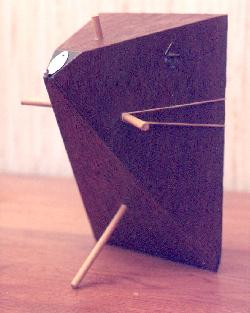
the camera
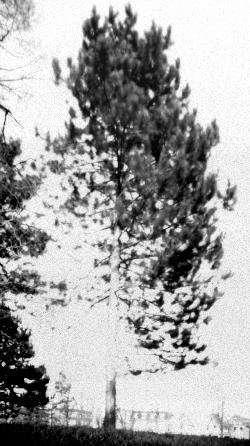
a tree, ready for measuring