Aberrations also differ for different distances between the object photographed and the lens, because the light rays come in at different angles. That has to be taken into account in close-up photography because most lenses are designed to minimize aberrations for objects 10x or more the focal length away from the lens. A lens used outside this range will have larger aberrations than within its design range.
Macro lenses are designed for a wide range of object-lens distances, which is done by making them more complex and by using small maximum apertures. High quality close-up photography starts with them. However, most lenses can give acceptable results outside their design range if the aperture is reduced enough. (Some aberrations, field distortion and lateral chromatic aberration in particular, are not reduced by stopping down. That's why I recommend macro lenses.)
Light consists of waves, and waves head off in all directions when they come close to an edge. The smaller the aperture, the greater this diffraction is. Ultimately, close-up images are a balance between small aperture (large diffraction) and large aperture (small depth of focus).
There are a number of ways to balance these factors to obtain fine closeup photographs. Here are the ones I've found to be the best.
Macro Lens: Quality closeup photography begins with a lens designed for the job, a macro lens. Most modern ones focus from infinity (0x) to 1:1 (1x). Since all lens info is sent to the camera, you can determine the exact size of everything in the photo. Just take a series of photos of a ruler to enable you to convert the distance recorded in the EXIF to magnification for each closeup lens you use. The Nikon 60 mm AF-D lens is excellent for this - it has more working distance than the IF-G equivalent when used normally and has the aperture ring needed for reverse use. Longer focal length non-IF macro lenses give more working distance when used normally, but are more unwieldy to use reversed. Internal-focus (IF) lenses focus mostly by changing their focal length, and have less working distance than equivalent older AF-D lenses.
Reversed Lens: Lenses have to have an aperture ring to be used reversed. The best results are obtained when the lens is designed to work at close-to-equal object and image distances. In short, a macro lens works best this way. And, there's a trick that lets one operate at its full potential: put the object at the same distance as the camera film plane would be and move the body away with bellows or spacer rings so it's where the object would be.
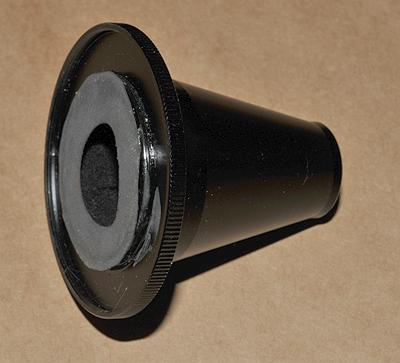
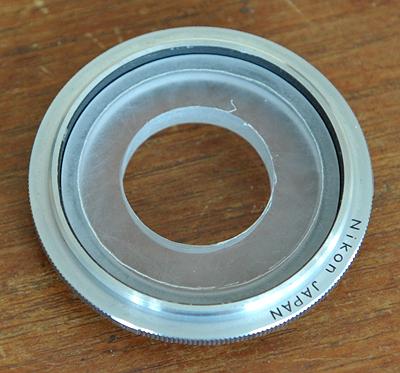
Here's how to do it. Make a jig using a rear lens cap and a piece of plastic tube so that a focus pattern is held at the correct distance from the flange of the lens, 46.5 mm for Nikon F-mount (others here). Mine is shown at right. Set the lens at the magnification desired using the built in scale. It's still accurate, it's just reversed too. Next focus on the image using the bellows. Finally, remove the jig and move the assembly as a whole until your subject is in focus in the viewfinder or live-view. Your macro lens is just as well corrected this way as when operating normally. Another option is to use filter spacer rings as at right, each marked with the magnification to set on the lens; for the 60 mm lens shown, 1 spacer gives 1.6x, 2 give 2.3x, 3 give 3x. The aberrations of the reversed lens are multiplied by the magnification, so become more visible the higher the magnification, but this method minimizes them.
Most fixed focal length lenses produce acceptable results at small apertures when reversed. Small wide-angle lenses generally work best. A good approximation to the real f# of a reversed lens is the indicated f# multiplied by (1+M/p) where M is the magnification and p is the pupil magnification. p is close to 1 for prime lenses in the 50-100 mm range, greater than 1 for reversed tele lenses, less than 1 for reversed wide angle lenses. The pupil magnification can be estimated by looking into the front and rear of the lens and measuring the diameters of the apparent apertures. p equals the front pupil diameter divided by the rear pupil diameter. p varies with focus setting with IF lenses, so has to be determined at each setting when reversed; it's easiest to avoid them.
Lenses are not designed to handle stray light when reversed, so more care is needed to avoid flare. Care is also needed with any high magnification method to reduce vibration - use shutter delay or mirror up mode to give vibration time to settle down from the mirror slap.
Microscope Objective: Microscope objectives are designed to be used in magnifying mode, and can produce better results than a reversed lens, especially at 5x and above. They are available from 2.5x-100x and are rated by numerical aperture (NA); the indicated f# for use in the formula above is effectively 1/(2*NA). An objective rated at NA 0.21 is f/2.4 They are limited in magnification choice, most have very short working distance, no aperture adjustment and few to no coatings; many are designed solely for use with matching eyepieces so are not fully corrected by themselves. It's easiest to choose one that's designed to focus its image directly rather than one that requires the complication of a matching field lens (infinity type). Correction for no cover glass is necessary especially at high powers, look for objectives designed for metallurgy. Nikon's old long working distance 210/0 M-series are superb if you can afford them.
As if all that isn't enough, adapting them to a camera is a problem as the only adaptors available from microscope RMS thread are to an M42x1 thread that no one seems to match with any other adaptor. I made an adaptor from M42 to the modern 62 mm size by drilling out a filter holder then epoxying them together. Flare-absorbing flocking along the cone and a light baffle or two must be added; all microscopists care about is identifying things, not getting photos with bite. With finite-focus objectives it's important to get the distance between objective and camera sensor accurate. An objective labelled 210/0 is designed for a microscope tube 210 mm long, but standard eyepieces focus 10 mm inside the end of the tube. So, the distance from the shoulder of this objective to the camera sensor plane must be 200 mm. A 160/0 objective must be 150 mm from the plane. Given the tiny depth of field of microscope objectives, you'll need to focus-stack multiple exposures. I use StackShot and Zerene Stacker.
If you persevere with this approach, you can get photos limited only by the wavelength of light, and the visual impact can be stunning. The gurus hang out here.
Coupled Lenses: When one lens is reversed in front of another with both focussed at infinity (afocal coupling) the magnification is the ratio of the two focal lengths. The rear long focal length lens should be wide open to avoid vignetting and the aperture controlled with the front short focus one. The real f# is the indicated f# multiplied by (1+M/p) as above. You'll find vignetting prevents you using many lens combinations, but the ones that don't vignette will work well; both lenses are operating as designed so are fully corrected. The aberrations of the front (reversed) lens are multiplied by the magnification, so choose a good one.
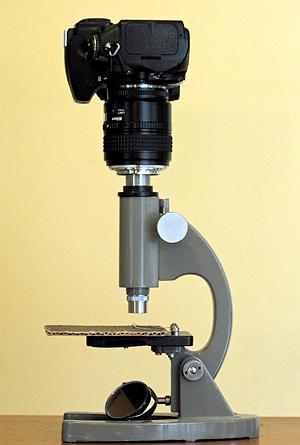
Microscope: A camera can be mounted on a microscope with acceptable results. The highest quality is obtained with a flat field projection eyepiece designed for photography. However, it's much less expensive to use standard interchangeable eyepieces and a camera lens. The photo at right shows a 60 mm lens focussed at infinity coupled to a microscope with a simple coupler - the conical lens surround sits on the eyepiece and is kept aligned by a filter ring adaptor turned on an electric drill with a file; it slides on the microscope column. With 10x eyepiece and 5x objective, I get 11x on the camera sensor; up to 100x is possible. The indicated f# for use in the formula above is 1/(2*NA).
Poorer Methods: Extension rings, that go between lens and camera, work acceptably with most fixed focal length lenses when small apertures are used, but produce poor results with most zoom lenses as the resulting field curvature is not reduced by stopping down.
Simple closeup lenses, even achromats, give much poorer quality than a true macro lens. Multi-element close-up systems such as those produced by Raynor are better, but still not as good as a quality reversed macro. If the strength of a lens is given as, say, 10x, this usually refers to the minimum focussing distance of the human eye, 250 mm; the focal length is 250 divided by the power, 25 mm for a 10x.
Focussing: First, if a fine corner-to-corner matte screen exists for your camera, get it and use it. Unfortunately, since the rise of autofocus, such screens are only available from third-parties such as KatzEye. The only alternative to breaking your warranty is to get a camera with what Nikon calls LiveView, to preview images on the rear screen at the lens opening to be used for the image. It's a poor alternative though, because stabilizing the camera against your face is one of the best there is for anything that moves too fast for tripod setup. And, don't forget to close the eyepiece shutter if you're relying on autoexposure; if your camera doesn't have one, make one.
Second, move the camera to focus, not the focussing ring. Set the focus ring to choose object size, and leave it alone after that. Moving the camera gives consistent results with any lens. The magnification and f/# stay the same and the focus plane moves with the camera in precise step with it. (further details)
With a tripod, get a macro focussing stage such as that shown at top right. Hand held, brace a part of your body on a solid object and pivot about it. For example, lean one shoulder firmly against a tree, and rotate about that shoulder while rotating your head to keep the camera aimed at the object. Close to the ground, put elbows on the ground, then pivoting can be nearly perfect, sufficiently under control for 2x magnification. At higher magnifications than that, a solid tripod with macro stage is pretty well essential.
As with normal photography, avoid stopping down below the diffraction limit: f/11 for my 12 Mpx FX D700. But, the effective f/# now depends on magnification (m). It gets small, quickly. And, depth of field gets small even faster. A good estimate of macro depth of field for FX is the real-f#/m2/20 mm; for DX divide by 30 instead of 20. It's worth noting that this depth is the same no matter how the magnification is achieved: if the object is photographed at high magnification and left uncropped, or taken at lower magnification and cropped. However there is a diffraction advantage to using the highest power lens that can include all the subject.
An example of using these numbers: A D700 image is 4256 pixels wide. To post uncropped on the web at 800 px wide, the maximum real-f# should be f/11*4256/800=f/58. For a 60 mm lens (p=1) at 1.6x, the indicated f# matching this is 58/(1.6+1)=f/22. The depth of field at this setting is about 58/1.62/20=1.1 mm.
This depth of field is based on the long-established industry standard of a circle of confusion 1/1000 of the image width. At magnifications much above 20x, when the size of visible details approaches the wavelength of light, traditional photographic measures of sharpness no longer apply - use your eyes to judge results.
Focus Stacking: As with normal photography, if depth of field is inadequate for an image, try to recompose. However, if you're at all serious about high magnification photography, you'll use a focussing rail and focus stacking. It works by combining the sharpest portions of each photograph in a series taken at different distances to produce a result that can't be produced by any one photo alone. (Quantum uncertainty applies only to linear processes. Focus stacking is non-linear, so quantum-mechanical limits can be, and are, evaded.) I use and recommend Zerene Stacker.
A great aid to focus stacking at high magnification, when many images are required, is an automated focus stage such as StackShot that can take the series at precisely equal intervals. Note the vibration damping support under the extension tube, together with mirror up mode and a solid support it's essential to minimize vibration blur. Even with the mirror up, the shutter produces vibration that lasts 5 ms or so; a relatively long exposure (I usually use 1/8 s at 20x) is useful. I also find that the effect of shutter vibration is least when the camera faces straight down. At the highest magnifications, some use flash illumination synchronized to the rear shutter curtain to reduce vibration. I find it more flexible to use multiple light sources, so I see what I'll get, and a long exposure time.
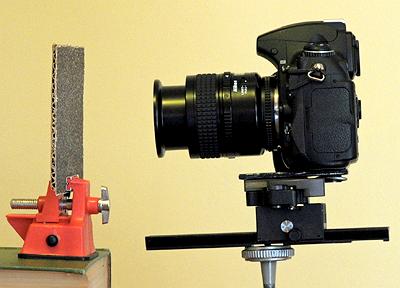
60 mm macro lens at 1x
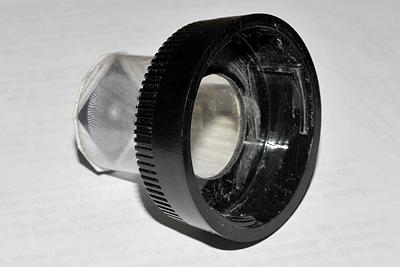
focussing jig for reversed lens
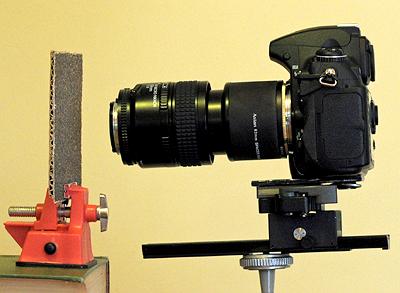
reversed macro lens at 1.6x
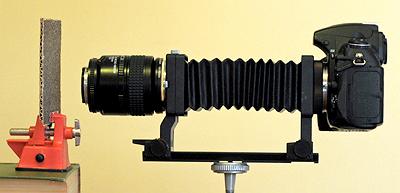
reversed macro lens at 6x
microscope objective adaptor
microscope eyepiece adaptor
microscope 11-100x
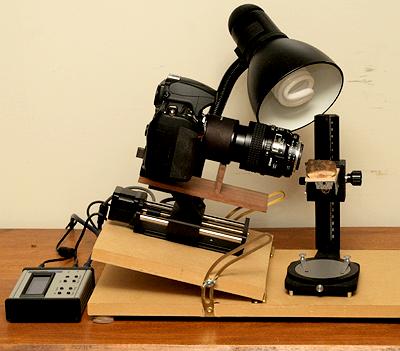
focus stacking system