
Quite frankly, rules for engaging are a complete pain in the ass. Unfortunately, if you don't have them, what happens is that combatants (on both sides) will happily hack away at one single opponent round after round until it expires (at least if they're smart), leading to rapid frustration and high rates of player attrition.
The rules in POCKET-SIZE FANTASY are really very easy to show someone, but hard to put into words. So I decided to supplement the explanation in the rulebook with the illustrated blow-by-blow walkthrough on this page.
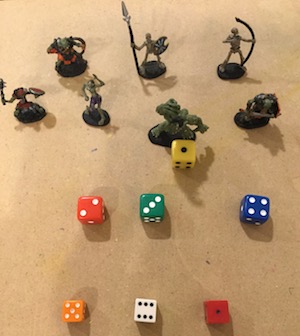
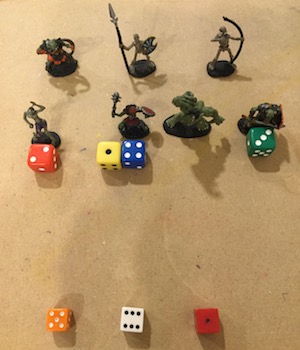
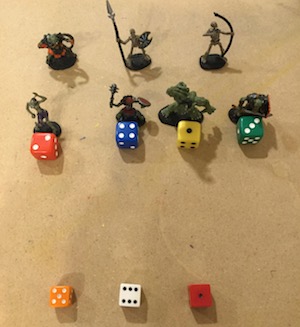
 | The Outset. Let's say that the players (that's you) won the initiative. Following your marching order, you placed Players 1 through 4 in the front line, from your left to your right. You decided to start the back line with Player 5, and filled your back line with the remaining figures, again from left to right, and again following your marching order. The Fantasy Master (that's me) isn't constrained by any marching order, so I filled my front line, from my left to my right (I'm seated facing you), with the pride of my army: a sword-bearing Ork, a Giant, a Zombi, and a Gobelin armed with a Morningstar. Note that as I placed them in my front line, I positioned them immediately opposite your own figures, as the rules require. I didn't have to put the same number of figures in my front line as you have in yours; I could have placed as few as 1 or as many as 6 in my front line. I only have to make sure that regardless of how many figures I put there, they are placed opposite yours, in order from my left to my right. I have wisely placed my ranged-weapon troops in the back line where they can fire away at you in relative safety. Figures in the back line (mine or yours) don't need to be positioned opposite any other figures. |
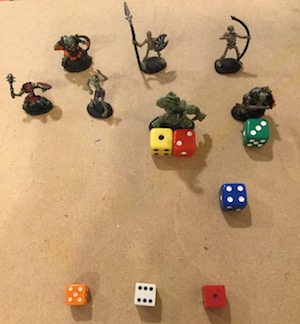
 | Player 1 Attacks the Giant. Following the rules, we will alternate between sides throughout the combat round, front lines followed by back lines. All figures will act in the order in which they are positioned when it is their line's turn to act. Thus Players 1 through 4 in your front line will act first, followed by my Ork, Giant, Zombi, and Gobelin. Following this, Players 5 through 7 (the red die with the single pip) will act in that order, followed by my three ranged troops in my back line, from my left to my right. Since you have quite rightly concluded that my Giant is going to be most likely to cause you problems, you decide to go for him first. Player 1 attacks the Giant and they become engaged (and not in a good way). Player 1's figure is placed opposite the Giant, and to indicate that they are engaged, we bring them slightly forward so that their bases touch. What of Player 3, who was originally opposite the Giant? Following the rules, Player 3 is displaced to the left of Player 1; but does not alter position relative to the other figures. Thus at this point Player 3 is between Player 2 (opposite the Zombi) and Player 1 (now opposite the Giant). |
 | Player 2 Attacks the Giant. Player 2 now decides to get in on the act and attack the Giant as well. Player 2's figure is placed immediately opposite the Giant (touching it to indicate that they are engaged) and in so doing displaces Player 1 to the left. Player 1 remains engaged with the Giant and does not alter relative position with respect to any figures farther left. At this point, both Player 1 and Player 2 are engaged with the Giant. Player 2's figure is immediately opposite the Giant. Player 1 is left of Player 2, but not opposite any of my figures, and Player 3 is left of Player 1, but also not opposite any of my figures. (There are only three occasions when figures are placed opposite each other: 1) on the very first combat round, when the side that lost initiative forms its front line; 2) when a disengaged figure attacks an opposing figure and they become engaged; 3) when figures move up from the back line to the front line because all figures on their front line have expired. — I suppose you could count switching with an engaged ally as a fourth occasion.) |
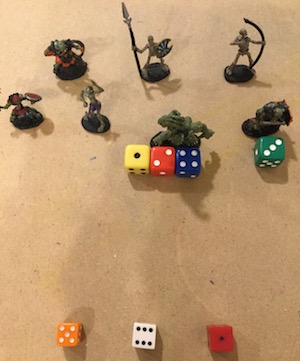
 | Player 3 Attacks the Ork. Sure of success and overcome by hubris, Player 3 opts to attack the Ork. Player 3's figure is placed opposite the disengaged Ork, touching it to show that they are engaged, and in the process displacing Player 4's figure to the left. Player 4 is now between Player 2 and Player 3, but is not opposite any of my figures. |
 | Player 4 Attacks the Giant. Player 4 now decides to attack the Giant; Player 4's figure is placed directly opposite the Giant and we have them touch bases to show that they are engaged. Following the rules, Player 1 and Player 2, who are already engaged with the Giant, are collectively displaced to the left, maintaining their order as well as their position relative to figures farther to their left. Following Player 4's attack on the Giant, Players 1, 2, and 4 are engaged with the Giant; Player 4 is opposite the Giant. Player 3 is engaged with and opposite the Ork. The Zombi is to the left of Player 1. (Incidentally, no more figures could engage the Giant at the moment, as he is engaged with the maximum of 3 opponents.) |
 | The Ork Attacks Player 3. All 4 figures in the players' front line have acted, so play now switches to the FM's (my) front line. My troops will act in order from my left to my right (remember that I'm seated facing you). Since the Ork is engaged with Player 3, he can't attack (or engage) any other player. It's too early in the fight to think of escaping or switching with a figure in the back line, so I opt to have him attack Player 3. This doesn't result in any changes in the lineups. |
 | The Giant Attacks Player 2. The poor Giant finally gets a chance to get back at the players for all the indignities heaped upon him. He is engaged with Players 1, 2, and 4 and can attack any one of them. He decides that the most fitting target for his resentment is Player 2. Again, this does not result in any changes in the lineups. |
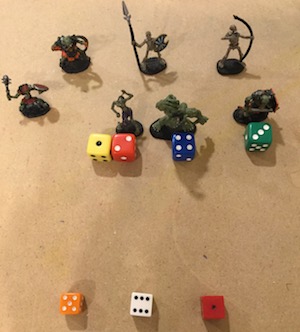 | The Zombi Attacks Player 2 … Outraged by the treatment of his friend the Giant and eager to seal Player 2's fate, the Zombi attacks Player 2. The Zombi is placed directly opposite Player 2's figure, displacing the Giant to the left, and Player 2 becomes engaged with the Zombi instead of the Giant ("peeling off"). Player 1 remains engaged with the Giant. However this requires some adjustment … (Incidentally, this was bad roleplaying on my part; Zombis aren't intellectually gifted enough for combat tactics of this level of sophistication.) |
 | … and "Peels Him off." As per the "peeling off" rules, figures on the players' front line have to be moved to my left until all figures engaged with the same opponent are grouped together. Player 4 is already opposite the Giant, so Player 1 simply skips over Player 2 and gets shuffled over next to Player 4. At this point in the fray, The Zombi is opposite Player 2 and they are engaged; the Giant is engaged with Players 1 and 4 and is opposite Player 4; and the Ork is opposite and engaged with Player 3. |
 | The Gobelin Attacks Player 4 … Here we see that the Gobelin too has come to the assistance of his friend the Giant, having chosen to attack Player 4. As before, the attacker (the Gobelin) is placed directly opposite the figure he is attacking (Player 4), displacing the Giant to the left (I had to move my Zombi and Player 2 over a bit to make room). In the process Player 4 has been "peeled off" and so becomes engaged with the Gobelin. However, Player 1 is still engaged with the Giant, and so … |
 | …and "Peels Him off." … a final adjustment is required. As per the "peeling off" rules, Player 1 must be moved to my left until he is directly opposite the Giant; he skips over Player 4 in the process. Now we have reached a much more equitable arrangement: all 4 figures in my front line are immediately opposite and engaged with the 4 figures in your front line. So much for ganging up on a helpless Giant! |
Concluding Observations.
At this point in the fray, all figures on both front lines have acted, so up next are the figures on the players' back line, who will act from their left to right, followed by the figures on my back line, again acting in order from my left to my right.
Worthy of notice is the fact that on the next combat round, figures in the players' front line will act in their new order: Player 2, Player 4, Player 1, and Player 3. Similarly, the figures on my front line will act in this order: the Ork, the Giant, the Gobelin, and the Zombi. Which side begins (your front line or mine) will of course be decided by the result of the initiative roll.
Now that it's your back line's turn to act, what should you do? You have a couple of choices: you can focus all your ranged fire on one of my units, hoping to take it out; but then my own ranged troops will happily return the favour: since they're acting last of all this combat round, they can't spoil the aim of any of your figures in the back line, so they have a lot more to gain by trying to fill a single one of your figures full of holes.
Your best option is probably to try to hit each of my units in my back line with ammo or a spell, because then you can spoil their aim, rendering them effectively useless this combat round.

FURIOUS RABBIT PRODUCTIONS
Back to the POCKET-SIZE FANTASY main page.
SPACE DUNGEON, POCKET-SIZE FANTASY, and the Furious Rabbit Productions logo © 2020 Richard Sembera.