Photography Jigs and Notes
A Balanced Tripod Mount
A Travel Tripod
A Panorama Mount
Stable Long Lens Collars
Notes on Focussing
D700 Active-D and Shutter Timing
A Balanced Tripod Mount
|
With the rise of digital cameras and their high sensitivity to light (Nikon D700 goes to ISO 25,600), monopods and
tripods are much less necessary than they used to be. But, tripods are still valuable for precise composition of photos,
especially macros, for taking
HDR sequences, for photos under starlight, and for remote-triggering.
The swing to zoom lenses has made regular working lenses much longer and heavier than was the case with primes. That
presents a problem: the center of gravity of a body+zoom-lens is now well in front of the body, so using the body
tripod socket leaves the assembly very front heavy and inclined to droop with the slightest softness in body-tripod
contact or tripod-ground contact. Long focal length lenses have long come with their own tripod socket to deal with
this problem, but working range zooms don't.
Canon provides a lens ring for some of their intermediate focal length lenses so they can be balanced, but not for
regular to short ones; Nikon doesn't at all. And, some zoom lenses don't have any place where such a ring could be
attached.
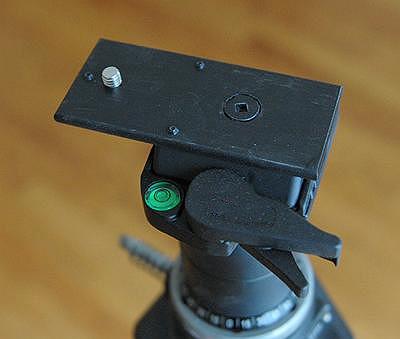
Here's a solution - a fixture that offsets the camera body socket from the tripod socket so the body+lens is balanced
on the tripod. It's a simple piece of stiff flat metal, easy to make with only hand tools. The only critical measurement
is the length between body tripod socket and the balance point of body+lens - 47 mm for a D700 plus 24-70 mm.
All other measurements are simply to match your camera and tripod.
The Nikon D700 comes with a soft pad around its tripod socket - not reliable when out of balance. So, three grub screws
are used to bypass the pad and connect the fixture firmly to the body, metal-to-metal. Pads on the tripod head are of
less concern with this method, since the load is balanced there, but should also be replaced with metal-to-metal contact
if really soft.
My version uses a Manfrotto quick-release tilt-rotate head. A single control loosens or tightens both ball and rotation,
and the
ball is large enough to be reliably steady with a load of 2 kg (the weight of Nikon D700 with 24-70 lens).
A flat-head 1/4-20 screw attaches the fixture to the tripod quick-release plate, a finger-friendly screw to the camera.
I usually don't need a tripod, so elected to keep a screw to attach the fixture to the camera body, rather than using a
second quick-release unit which would add yet more weight to the camera. My already-heavy telephotos do have their own
quick-release plates pre-attached.
It's solid, and makes framing much easier and more stable.
| |

|
A Travel Tripod
In the field, when long treks preclude carrying a heavy tripod, the adaptor allows a combination
of a Rowi travel tripod and a Vivitar rack&pinion to be solid. Whether used as a tripod,
screwed to a fence post, clamped to a table top, or used with a macro stand, everything stays in
balance.

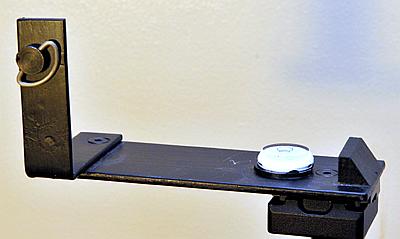
A Panorama Mount
The same homemade technique saves hundreds of dollars over commercial systems for taking panoramas,
when the camera must pivot about the entrance pupil of the lens. Here's how to find it for your
lens. The one at right, for the Nikon 14-24 mm, cost $5 for metal plus $6 for a
toolmaker-grade level. Note the anti-vibration shim - always use them with physically long lenses
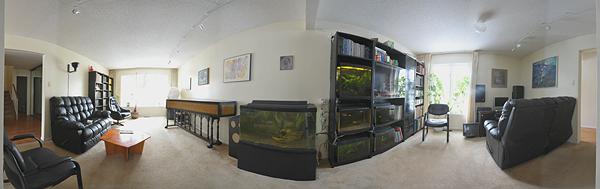
like this. More than one lens? Just drill extra holes where needed. Below is a 360° result
using 14 mm focal length: 10 cm to 7 m distance.
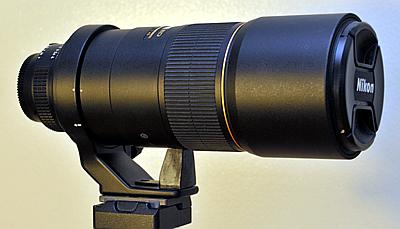
Stable Long Lens Collars
Most long lens collars are too flexible, too sensitive to vibration that blurs images. Bulky and expensive aftermarket
collars are provided by several companies such as Manfrotto and RRS,
but why not just fix what you've got? Small, light, and practical. Here is a solution.
Carve a piece of hardwood to fit firmly into the collar of the lens. The lengthwise grain of the wood runs vertically
- it's the grain direction that changes in length the least when moisture varies. A thin teflon sheet between wood and
lens provides elasticity that avoids excessive force on the lens and is low friction to allow the collar to be
rotated and removed easily.
| |
|
Notes on Focussing
Depth of field tables and hyperfocal distance are based on a fallacy, that human eyes work the same way as a mathematical
equation based on circle of confusion. They don't! Some things are much more important to our eyes than others.
Here are the guidelines I use to focus.
When as many things in the image as possible are to appear sharp in the image, set aperture at the
diffraction limit for the camera: f/11 for my primary camera, a Nikon D700. Then, if
one object is critical to the bite of the image, usually the item with the finest detail, focus on it. Otherwise,
focus on the farthest object that is wanted in focus - that's where the lack of detail usually shows first. If this
procedure doesn't show everything important to the image in sharp focus, recompose the image. Stopping down further
than the diffraction limit kills bite.
A different way of looking at focussing is based on the recognizability of objects. Look in the front of your lens
and close down the diaphragm until it appears to be the size of the smallest objects you want to be recognizable in
the image. Not sharp with bite, but recognizable for what they are to our eyes. Focus on the farthest such object.
Then, all objects of the iris size or larger that are closer to the camera will be recognizable no matter what
distance they are from the camera. For people's faces, the iris size should be a maximum of 5 mm, no matter what
the lens focal length.
When something is to be thrown sufficiently out of focus that its detail is not recognizable, a physically large aperture is needed. That's easiest to get with a lens of long focal length, so begin by choosing the longest focal
length that will include all of the objects wanted in the image. Focus on the wanted object, then use the formula
S/I=d/D, where
S is the size of the largest detail on the unwanted object that will make it recognizable,
I is the iris size,
d is the distance between the object that is wanted and the one that isn't, and
D is the distance to the object that is wanted.
d and D must be in the same units, S and I in the same units, but S and I don't have to be the same units as d and D. Use percentages: if d is 50% of D, then S must be 50% of I. The iris diameter in this case must be double the size of
the largest detail of the unwanted object. Today it's usually easier to use Photoshop's soften function on the
desired areas than to do it all with the lens.
John Sankey
Notes
These are the internet firms I've dealt with for photography stuff that I've found trustworthy for Canadians:
Vistek
CameraFilters (USA)
Lens Focussing: The effect of changing focus with the focus ring depends greatly on the lens. A simple lens
focusses
closer by moving the lens away from the sensor and towards the object at the same time, so magnification increases
and so does effective f/#. At close range (twice the lens focal length or closer), focussing is strongly non-linear
(actually hyperbolic). The Nikon 60mm AF-D macro works this way. Many IF macro lenses reduce the focal length of the lens to focus close to keep the physical length of the lens small. Some lenses are part way between, such as the
current Nikon 105mm macro. And some do more complicated things still, such as the Nikon 70-180 macro that is
designed to keep constant effective aperture with focussing. With cheap macro lenses, the field curvature changes
with focus ring movement as well. So, unless autofocus is the only option to keep up with a scurrying bug, move the
camera not the focussing ring with macro photography.
 D700 Active-D: Active-D for the D700 has two parts. First, it changes the shape of the overall gamma curve
to lower contrast
as shown at right (measured at ISO 200, picture control neutral). Second, it scans the image for detail in
shadows and increases their local contrast in a
manner similar to HDR programs. Such a process, a
generalized sharpening, increases the visibility of noise in the image so is best used at low to moderate ISO. From
the effect on buffer memory, it seems that it stores the sensor RAW in buffer, transforms it into another RAW, and
only then converts the second RAW into TIFF/JPEG for transfer to the flash card. The process takes close to a second
per image, so must be turned off when taking rapid sequences (CH mode).
D700 Active-D: Active-D for the D700 has two parts. First, it changes the shape of the overall gamma curve
to lower contrast
as shown at right (measured at ISO 200, picture control neutral). Second, it scans the image for detail in
shadows and increases their local contrast in a
manner similar to HDR programs. Such a process, a
generalized sharpening, increases the visibility of noise in the image so is best used at low to moderate ISO. From
the effect on buffer memory, it seems that it stores the sensor RAW in buffer, transforms it into another RAW, and
only then converts the second RAW into TIFF/JPEG for transfer to the flash card. The process takes close to a second
per image, so must be turned off when taking rapid sequences (CH mode).
D700 Shutter Timing:
All Nikon specifications have ±5% wiggle room. Almost all their wide angle lenses have longer focal
lengths than specified, while telephoto lenses are almost all shorter. The maximum apertures of most lenses are
less than specified. Shutter times for the Nikon D700 are in a precise ratio of 1/3 stop to each other,
with the exception of the longest, 30 s, which should be 32.9 s but is in fact only 32.0 s. However
the actual times are longer than specified; this must be allowed for when taking multiple exposures. For example,
the interval timer must be set to 33 s for taking star and other light trails when the shutter is set to
30 s. Measurements made by Marianne Oelund.
| marked | actual | marked | actual
|
| 30" | 32.0s | 1.3 | 1/1.224
|
| 25" | 26.1 | 1.6 | 1/1.542
|
| 20" | 20.8 | 2 | 1/1.94
|
| 15" | 16.5 | 2.5 | 1/2.45
|
| 13" | 13.1 | 3 | 1/3.08
|
| 10" | 10.4 | 4 | 1/3.88
|
| 8" | 8.24 | 5 | 1/4.89
|
| 6" | 6.54 | 6 | 1/6.17
|
| 5" | 5.19 | 8 | 1/7.76
|
| 4" | 4.12 | 10 | 1/9.78
|
| 3" | 3.27 | 13 | 1/12.32
|
| 2.5" | 2.59 | 15 | 1/15.5
|
| 2" | 2.06 | 20 | 1/19.6
|
| 1.6" | 1.63 | 25 | 1/24.6
|
| 1.3" | 1.29 | 30 | 1/31.17
|
| 1" | 1.030 | 40 | 1/39.1
|
| | 50 | 1/49.3
|
| | 60 | 1/62.0
|
| | 80 | 1/78.0
|
| | 100 | 1/98
|
| | 125 | 1/124
|
| | 160 | 1/156
|
| | 200 | 1/196
|
| | 250 | 1/247
|
| | 320 | 1/310
|
| | 400 | 1/392
|
| | 500 | 1/490
|