Easy Web Pages
with Netscape Composer 7.1
Let's get started!
Headings
Formatting text
Saving your page
Adding links
Adding images
Graphic formats
Access time
Background
Tables
Contact info
Preview your page
Adding pages
Putting it on the Web
Check it again
Troubleshooting
Updating your site
For advanced users
Creating Web pages
- the easiest way to create your Web page is to use a program
like Netscape Composer (part of the Netscape browser/email suite)
- you create your page(s) on your own computer, then upload the files and pictures to NCF
- you can download the Netscape 7.1 browser suite, which includes Netscape Composer, from the Netscape site OR if you're an NCF member you can ask the NCF office for a copy of the NCF Tools CD, which includes freeware anti-virus, anti-spyware and other useful programs in addition to Netscape (we ask for a donation of $5 to offset the cost of preparing the CD and an extra $5 if you would like us to mail it to you)
- once you have Netscape, you must install it on your hard drive
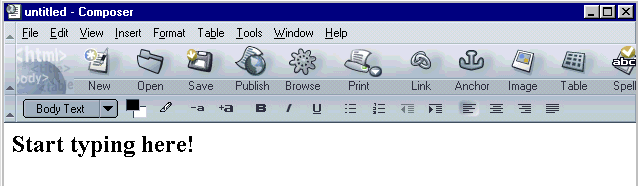
Let’s get started!
- click Start, Programs, Netscape 7.1, Composer
- click View on the menu bar at the top and make sure Normal Edit Mode is selected
- click View, Show/Hide, and make sure that there are check marks beside Composition Toolbar and Format Toolbar -- all the functions on the toolbars are also available from the menus, but we’ll be using the toolbars in the explanations that follow
- now just start typing to create your Web page!
Create a heading
- to make a heading for your page or for a paragraph, type the text, then while you’re still on the same line, click on the arrow beside Body Text on the Format toolbar and choose one of the Headings
- Heading 1 is the largest, Heading 4 is usually the same size as the default page text, and Headings 5 and 6 are usually smaller (but how these are displayed will depend on the browser that your visitor is using)
Heading 1
Heading 2
Heading 3
Heading 4
Heading 5
Heading 6
Format your text
- most of the options like bold, italic and centering that are available in word processors are also available in Composer -- check for them on the Format toolbar and the Format menu
- you can change the colour of text and make the size smaller (-a) or larger(+a) from the Format toolbar
- you can also make bulleted, numbered and other lists using the buttons on the Format toolbar or Format, List on the menu bar
- you can choose a font from the Format, Font menu but you're best to stick with Helvetica, Arial or Times because they look almost the same on all computers
- be especially wary of choosing unusual fonts -- if the font you specify is not installed on the computer of the person viewing the web page, his browser will substitute another which might give a totally different effect!
Save your page now
- your main Web
page or “home” page on NCF must be named index.html
- it's a good idea to create a separate folder for your Web page, so that everything will be together in one place
- the first time you save your page, it will ask you to insert a title if you haven’t done so already; the title appears in the title bar at the top of the viewer's browser and in his bookmarks/favourites if he bookmarks your site, and it is used by search engines to reference your page - it should be meaningful and short!
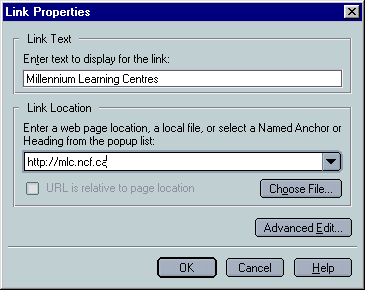
Add links to other Web sites
- to insert a link to another Web site:
- make sure that you have already saved your page
- highlight the words on the page that you want to use for
the link (like "Netscape" in the section above Where can I get Netscape
Composer?)
- click on the
 Link button at the top of the screen
 - indicate the Web address of the site in the Link Location box -- make sure to include http:// at the beginning, which indicates to Composer that this is the address of a page on the World Wide Web
- if the link is long, it may be a good idea to browse to the page when you're online, copy the address, then paste it into the Link Location box so you don’t mistype it
- you can also create a link by dragging it from another window -- highlight the link in a web page, your bookmark edit list or an email, for instance, and drag and drop it onto your page
Add images
- each graphic (picture, logo, button, etc.) that you see on a Web page, such as the picture of the Image button and the screen capture of Netscape below, is actually a separate file from the Web page itself -- you have to tell Composer where to find the file for each graphic that you want displayed on the page
- it's best to put your graphic files in the same folder as your Web page -- make sure to copy them to the folder before you add them to your Web page
- you should also make sure that you have saved your page before you add graphics
- to insert a picture or other graphic, click the Image
button
 at the top of the screen, then the Choose File button -- browse to your
graphic file and click Open
at the top of the screen, then the Choose File button -- browse to your
graphic file and click Open - type a short description of the image in the box
beside Alternate text; this will display in text browsers for the
visually disabled and in other
browsers while the image is loading
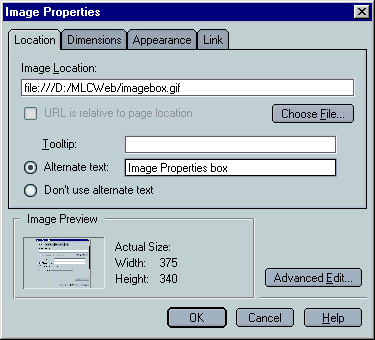
- you can choose how the text will wrap around your image, how much space should be left around it and whether to have a border, all from the Appearance tab
- while you can choose what size your image should be from the Dimensions tab, it's often easier to leave the height and width at Actual Size at this point and adjust the size by clicking on the image on the Web page and dragging its corner with the mouse when the pointer turns to a double-pointed arrow
- if you want the image to be centered, select it then click the Align Centre button on the Formatting Toolbar
- there are several online sites that will let you create custom titles, buttons, etc. for your site -- check out Cool Archive, 3D Text Maker and Flaming Text -- but don't go overboard, as graphics can add significantly to the time it takes for a visitor to download your page for viewing
Important information about graphic formats
- graphics for the Web should be in GIF, JPEG or PNG format -- you can tell that a graphic is a GIF, JPEG or PNG because its filename will end in .gif or .jpg or .png (if Windows does not indicate the 3-letter “extension” for your files, double-click the My Computer icon on the desktop to open it, choose View, Folder Options or Tools, Folder Options, click on the View tab, then uncheck Hide file extensions for known file types)
- note that JPEGs are mostly used for photos, and GIFs for simpler images such as the ones on this page
- to convert images from other formats like .tif, .bmp or .wmf, you can use a variety of programs ranging from simple shareware or freeware file viewers and image editors, such as IrfanView32, to complex graphic programs like Corel Draw or Adobe Photoshop
- it's best to have your image fairly close to the size you want it to appear on your Web page before you add it in order to reduce the file size
- this tutorial on IrfanView shows you how to convert your image to a .gif or .jpg, as well as reduce its size (and therefore the size of the file)
Watch the
access time!
- if it takes longer than 10 – 15 seconds to load your page,
many visitors will have moved on
- images can take a long time to download, especially on a
dialup connection -- you should limit the number
that you include and “optimize” them (minimize the size of the graphic
file while maintaining an acceptable level of quality) using a program
such as IrfanView (see this tutorial on Using
IrfanView to Crop, Resize or Compress Images) or on line at
a site such as GIFWorks
or Netmechanic
- other elements that take a long time to download are sound or music files, Java programs, video, and programs such as counters that must be downloaded from another site
- in 10 seconds under optimal conditions a user on a 56K dial-up connection can only download approximately 54Kb (the size of the page includes the size of the file itself + the size of all graphics and sound files)
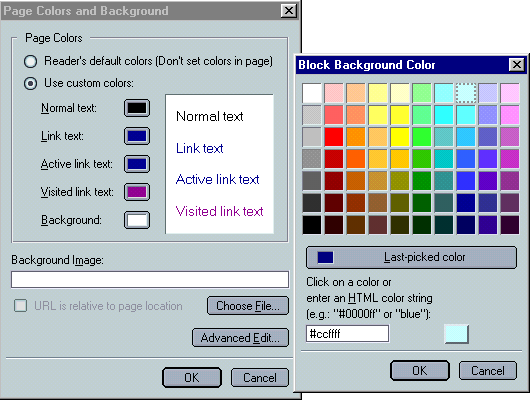
Change your page's background
- to set a coloured background for your Web page, choose Format, Page Colors and Background from the menu bar, select Use custom colours, then click the box beside Background
- if you choose a dark-coloured background, you may also need to change Normal text to another colour, but beware of using light colours on a dark background as it is hard on the eyes and can be offputting for visitors to your page
- to choose a graphic that will be tiled (repeated all over the page) in the background, choose Format, Page Colors and Background, then choose a graphic file for the Background Image (remember, it should be in the same folder as your Web page) -- make sure it's not too dark, or people will not be able to read the text on your page
Make a table
- just click on the Table button
 at the top of the screen and choose the number of rows and columns you
want
at the top of the screen and choose the number of rows and columns you
want - type 0 in the Border box if you don't want any border (there will still be guidelines on the Composer screen, but no lines will appear when people look at your page with their browser)
- a border of 1 looks like this:
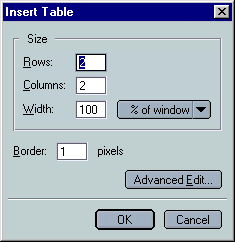
- a border of 5 looks like this:
- you can add or delete rows and columns at any time by right-clicking in the table and choosing Table Insert or Table Delete from the context menu that pops up
- once your table has been created, you can right click in
any cell and choose
Table Cell Properties, to change the size, alignment, background
colour, etc. of the table or cells
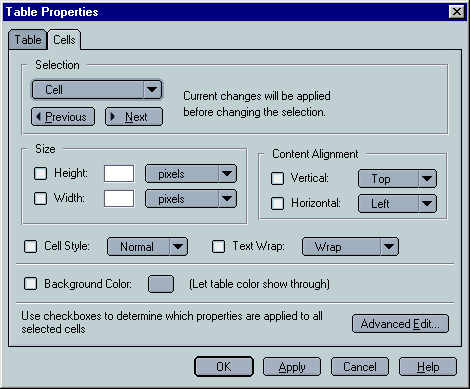
- tables are often used in Webpage design - for instance, this page is set up in a table with two columns
Add contact information
- to protect yourself from spam, use NCF's Comment-Taker to
enable people to contact you by email
- just include a link like this in your web page:
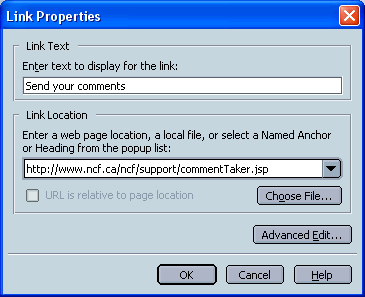
Of course you can use text other than 'Send your comments' in the link. When the user clicks on that link, a web form will be displayed inviting them to enter a comment. When they press 'send' on that form, their comment will be emailed to you as owner of the web page - for more information on the NCF Comment-taker, consult the FAQ
- if you're doing the web page for a group, you may
want to put the group's address and phone
number, but if it's a personal page, you should be wary of posting
personal information such as your address,
phone number or other personal details online
Preview your page
- you can check what your page will actually look like by
saving it, then
clicking the Browse button at the top of the screen -- this will open
your page in Netscape
- remember your page may look slightly different when viewed in different browsers and on different computers
- it's a good idea to look at it in Internet Explorer as well:
- make sure your latest changes have been saved
- open Internet Explorer
- click File, Open
- click Browse, find your Web page file and select it
- click Open
- click OK
- check that it looks as you expected!
Create
additional pages - - now you'll have a Web site!
- you create other pages for your Web site in the same way as the main page, typing the text, formatting it and adding any other features you want
- save the pages in the same folder as your main page -- when
you're naming
your Web files, it's best not to use spaces in the filenames, not to
mix cases
(make the filenames all lowercase) and to keep them short - case
distinctions won't matter on your home computer, but when you load your
pages and graphics onto the Web, suddenly the graphics may not show up
any more and the links to your other pages may not work (that's because
your computer doesn't distinguish between upper and lowercase, but Web
servers do)
- to allow your visitors easy access to secondary pages, put a link to them on your main page or on another page or pages in your site
- to add a link on your main page to another page that you have created:
- open the main page
- highlight the text that you want to act as the link
- click the Link button
- click the Choose File button
- highlight the file for the secondary page and click Open
- click OK
- you now have a link on your main page to the secondary page you have created! (the link should contain only the filename of the page, if you've saved all your pages in the same folder -- make sure that it does not include file:/// and the path before the filename before you upload it to the Web)
Put it on the Web for everyone to see!
- in order for people to see your page(s) from their computer, you must post them on the Web
- to do this, you upload your Web page(s) to NCF
- the NCF Web File Manager is the easiest way, because you
don't have to configure it:
- log in to your personalized NCF StartPage and click on 'Web file manager' under 'Tools' at the right side
- click the Browse button at the right of Upload file to NCF -- this opens a window showing the files on your computer
- locate the first file you want to send to NCF, highlight
it and click Open; then click the Upload button in Web file manager
- repeat the previous step for each picture or other
graphic file and each extra page that you have
- another way is to use an FTP program such as WS-FTP - here are instructions for obtaining and configuring it
Check your page
again once it's on the Web
- now that your page is uploaded to NCF, check to make sure that the online version looks OK in Netscape
- make sure that all of the graphics appear and that all of
the links, including any you might have to secondary pages on your
Website, work properly
- check it as well in Internet Explorer
- if it's an organizational Web site, you might want to check
how it appears in other browsers like Opera or Firefox, and on other
platforms, like Mac or Linux (you might have to enlist other people
from the organization to do this for you)
Troubleshoot your page
- if any of your graphics do not appear or any of the links
to your secondary pages do not work in the online version, check the
following:
- verify that you have uploaded the file for the graphic or page to your Webspace on NCF
- make sure the filename has no typographical errors
- if it does, change it on the copy on your computer, save the file and upload it to your NCF Webspace
- filenames on Web servers are case-sensitive
- check the listing of the files in your Web space using either the NCF Web File Manager or a program like WS-FTP
- if the file in your Webspace and the reference to it on your Web page do not match exactly, it will not be displayed on the Web, though it may be OK on your home computer (Windows does not distinguish between upper and lowercase in filenames, but Web servers do)
- note that Windows has a nasty habit of changing the filename to uppercase when it uploads the file itself, if any of the letters have been in uppercase
- if this is the problem, change the references to the file in the copy of the page that is on your computer, save the file and upload it to your NCF Web space OR rename the file in your NCF Web space so that it corresponds to what you have on your Webpage
- is the link to the file for the graphic or the secondary page prececeded by file:/// ?
- Composer has a very annoying habit of changing the filename to reference the location on your computer, rather than leaving it at the filename alone (which is what you want if you kept everything in the same folder as suggested above)
- redo the link in the copy of the page that is on your computer, save the file and upload it to your Web space
- when you look at the page online again in your browser after making changes, be sure to click View, Refresh or View, Reload so that you will be seeing the most recent version of your page on the Web
Updating your pages
- update the copy of the page on your own computer, save the changes, then transfer the file to NCF where it will overwrite the older file
- if you have added any new pictures or other graphics to the page, be sure to upload them as well
- if you want to add new pages to your site, create them on your own computer, then upload the new file to your NCF Web space
- if you want to add a link to the new page on existing pages
of your Website, do that on the copies of the pages that are on your
computer, then save them and upload them to NCF
- be sure to check your updated page(s) to make sure that Composer hasn't changed any references to graphics or secondary pages when you re-saved your file(s)!
For Advanced Users
- in Composer you can edit the HTML code directly by choosing View, HTML Source from the menu
- a good place for beginners to learn about coding Web pages
is Web Diner's Web
Adventure; as it says on the site: "There is no perfect HTML
editor, and without
some knowledge of HTML, you won't be able to correct the mistakes that
either you or your HTML editor makes." (your HTML editor in this case
is Netscape Composer)
- on NCF you can include Java, Java Script, VB script, Active X and other client-side features in your Web page, but not CGI scripts or other server-side features