Installation:
Read up on the shock swapping possibilities ( The How to NOT cut the battery box
and the SV rear shock compatibility chart
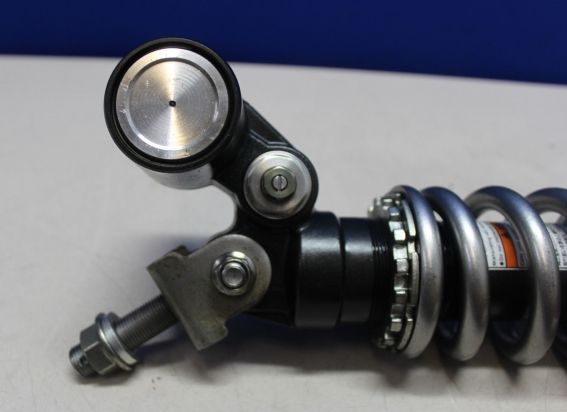
) for a 2000 SV650S and purchased a ZX6R shock, 2009 - 2012 vintage via
eBay. Spring rate (per Racetech) is 9.2 Kg/mm (stock 9.1 Kg/mm) and
length is 339mm (stock 337 mm), with adjustments for preload, rebound
damping, and low and high speed compression damping - lots of knobs to
play with.


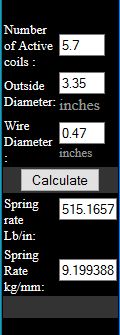
The calculated spring rate per Racing Suspension Products
is pretty close.
 FYI,
my weight is about 84 Kg., riding is all street, no track. I personally
think stiffer springs front and back are primarily for bike attitude
control under heavy acceleration and braking on smooth surfaces, i.e.
racing conditions. My interests are more for comfort on bumpy roads and
road holding in bumpy corners, so the front stays at the stock 0.7
Kg/mm (with emulator knock-offs), and the rear spring rate stays close
to stock, but now with adjustable and hopefully more sophisticated
damping.
Steps:
Still on the side stand:
- loosen tank front and back
- remove battery
- remove battery-box screws
- remove starter solenoid
- loosen top shock nut, rear dogbone nut
Pop onto jack stands under footpegs:
- remove shock out top and replace
- fabricate brackets
- remove battery holder
- zip ties to hold battery away from shock reservoir
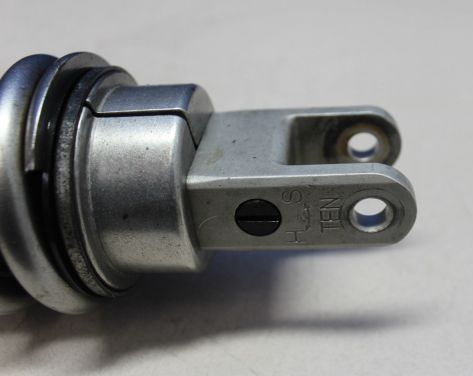
The ZX6R shock bushing is ~30mm wide at the top, and
the shock flange inside dimension is ~30mm wide at the bottom, a
perfect fit for the SV650.
The flanged 10mm lock nut came
with the ZX6R shock top bolt, which was unfortunately at 51mm just a
smidgen too short for the ~45mm outside width of the flange. The metric junk box had an M10 x 60mm
bolt which was hacksawed down to 55mm.
The
SV650 knuckle where the shock attaches has more space to the dogbone on
the left than the right. The shortened bolt is 61mm long including the
head, and the bushing between the dogbones is 68mm, so there's ample
clearance as long as the bolt head is positioned to the right, and the
thicker lock nut to the left.
The lower shock flange bolts to a 30mm bushing inside a needle bearing
and it is free to move side-to-side a bit. There was still plenty of
clearance to the dogbones at both extremes of the bushing position.
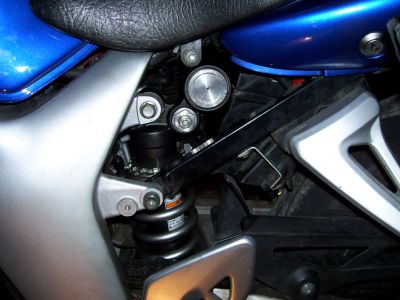
 Lowered
the battery box with brackets, custom bent from 3" mending plate
to give about 1.75" space, allowing the battery to clear the shock
by about 1/8".Trimmed the battery holder thingie off the tank hinge
with a hacksaw.
Drilled a couple of holes in the back of the battery box and zip-tied
the battery to the back of the box.
Initial settings (from the ZX6R 2009 manual):
- Rebound - 15 clicks counterclockwise (of 21) from full hard
(clockwise)
- High Speed Compression - 3 turns counterclockwise (of 4)
from full hard (clockwise) (outside damping adjustor, 12mm wrench)
- Low
Speed Compression - 3 turns counterclockwise (of 5) from full
hard (clockwise) (inside damping adjustor, flat head screw)
- Preload - spring length 179mm
Rear Sag:
 At
the recommended 179mm spring length, a reference measurement was taken
with the bike up on the jack stands (no load on shock). With the bike
weight supported by the paddock stand, the unladen sag was 15mm. Then
with my weight added, laden sag was 40mm.
These figures are
about 5mm high and were corrected with a ~2mm tweak in the
preload, changing spring length from 179mm to ~177mm. Sag figures
are now a happy 10mm unladen and 35mm laden. The preload can be
adjusted on the installed shock.
Evaluation:
This was an Ottawa winter 2015/16 garage project, and I thought riding and
on-the-road evaluation would have to wait 'til Spring. But . . .
Incredibly good riding weather today (Dec. 24th, 2015) in Ottawa, Canada. 17 deg. C. and sunny, a bit windy.
Tried
out the newly installed ZX6R shock, seems to be working fine with the
chosen sag and default damping settings. Better compression damping
over low speed bumps, not much more harsh over our larger potholes. In
comparison, the old Gen1 shock seemed dead, transferring jolts directly
to the derriere.
Also able to ride on Dec. 25th (Merry Xmas) and 26th, and that just reinforces first impressions.


 FYI,
my weight is about 84 Kg., riding is all street, no track. I personally
think stiffer springs front and back are primarily for bike attitude
control under heavy acceleration and braking on smooth surfaces, i.e.
racing conditions. My interests are more for comfort on bumpy roads and
road holding in bumpy corners, so the front stays at the stock 0.7
Kg/mm (with emulator knock-offs), and the rear spring rate stays close
to stock, but now with adjustable and hopefully more sophisticated
damping.
 Lowered
the battery box with brackets, custom bent from 3" mending plate
to give about 1.75" space, allowing the battery to clear the shock
by about 1/8".Trimmed the battery holder thingie off the tank hinge
with a hacksaw.
Drilled a couple of holes in the back of the battery box and zip-tied
the battery to the back of the box.