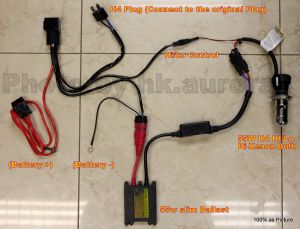
 Winter project time in Ottawa. Fall 2010, bought a 55W bi-xenon HID
motorcycle setup kit and this is what you get from the supplier.
Component Mounting
 I
did the initial install in Jan.
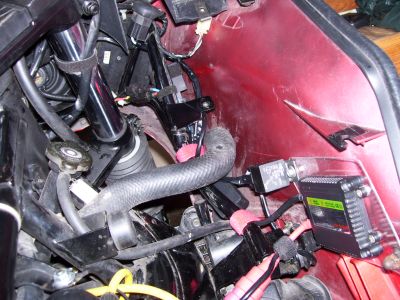
2011, my fingers are still thawing out. Based on wire lengths and
available space, I located all components inside the fairing to the
right of the gas tank. Fabricated a little platform for the ballast
from 1/16" lexan, held by 3 existing screws, two frame brackets and the
reflector. Ballast is bolted to this platform.
Wiring is routed along the front fairing frame, held by velcro straps,
locating the ignitor below the frame bar. Ground lead goes to an
ignition coil mount screw.
Had to cut the middle out of the rubber dust shield. There's a gasket
between the bulb base and reflector housing which should keep out
water.
Instructions
The printed instructions were interesting:
- "Install the lamp holder to headlight socket and press
tightly by spring"
I believe this means install the headlight holder,
re-attach the spring, and it will all be held together tightly. This
was straightforward on the Concours.
- "when installation the lamp holder, the headlight inside
reflector will hold the lamp holder, please disassemble the top of the
lamp holder"
This one is trickier. The lamp holder has a round
reflector
thingie on the end, held by a screw. I believe this instruction means
if this
reflector thingie bashes
into something inside the headlight housing (e.g. an internal
reflector), take the thingie off and throw it
away. Then the rest of the holder will fit in. I didn't find this was
necessary for the Concours, but I've read that some people discard the
thingie to change the light pattern.
Initial Schematic
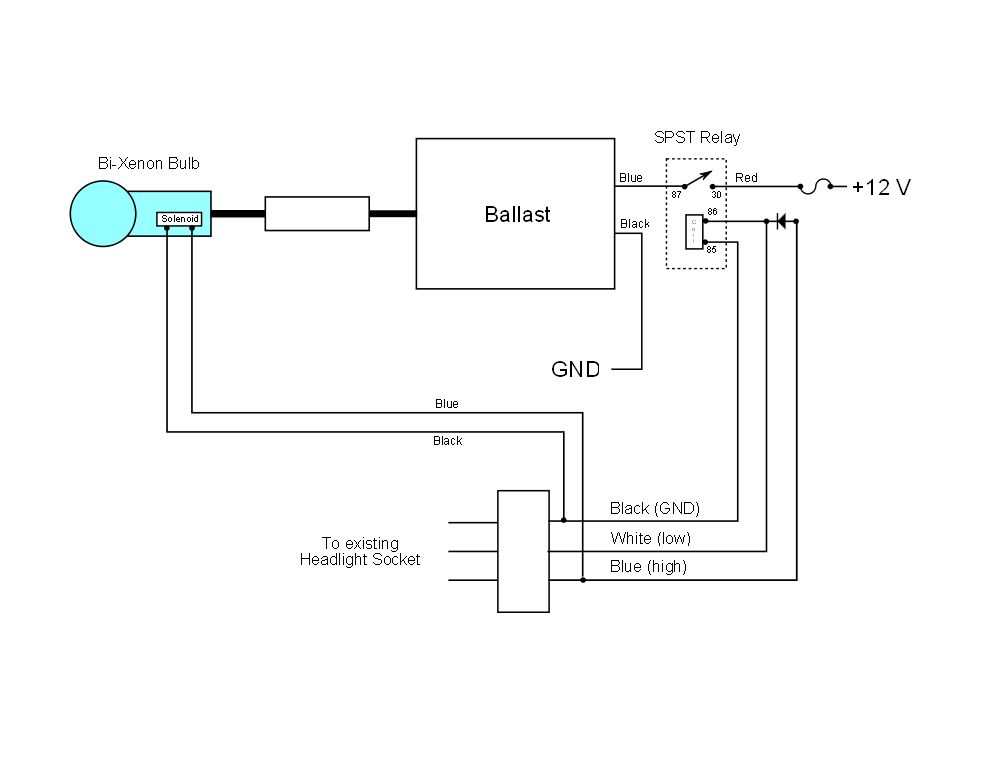
 As delivered, it used a separate fused lead to the battery, isolated
the high and low beams with a diode, and used a SPST relay to control
the headlight
current. I wasn't too thrilled with the power lead running all the way
back to the battery post.
The Ottawa winter kindly allowed further rumination. Noticed that other
eBay
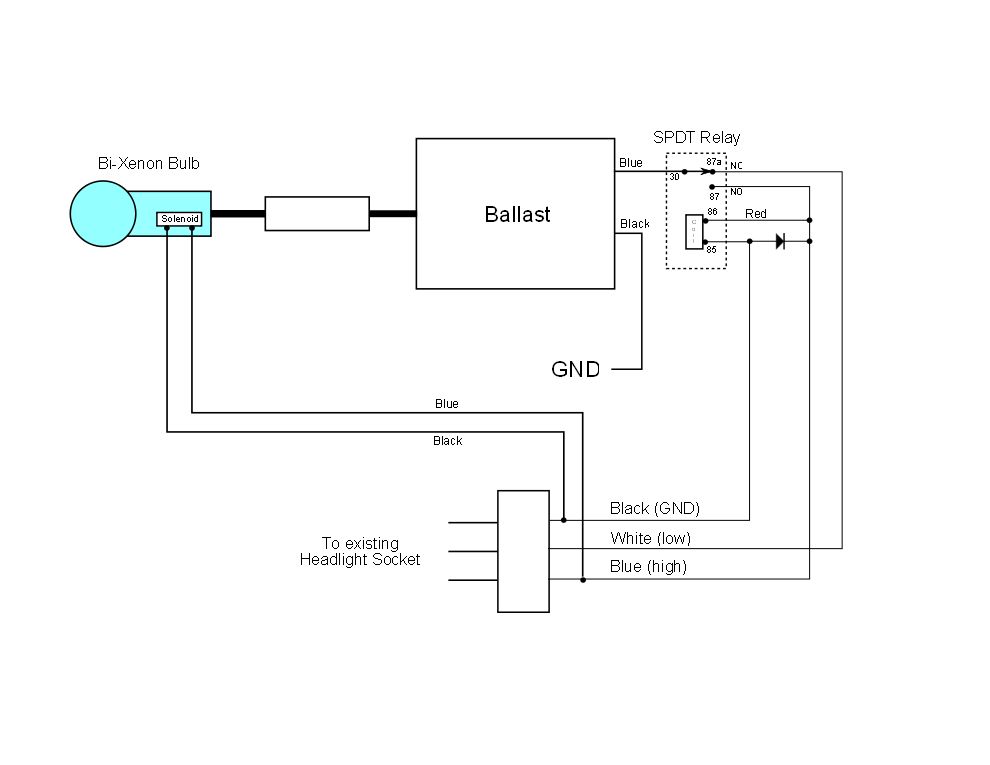
kits did not need the separate battery lead. Figured out that a SPDT
relay would get around that and had a spare SPDT relay kicking around
in the basement parts pile from a defunct project (fog lights).
 Revised
Schematic
So (Feb. '11) I removed the SPST kit relay and socket, pulled
out the
relay socket connectors, added a connector for the Normally Closed
contact, did a
bit of cutting and soldering, inserted the SPDT relay and now it should
work drawing power directly from the existing headlight connector. The
SPDT relay has a mounting tab that fit nicely onto one of the platform
screws.
This has its pluses and minuses. It's more self-contained, with all the
wiring
and components up near the headlight. However, all the current (~5A)
goes through the J-Box relay contact. As 55W is the stock design
headlight load, and I've had ~7A flowing through there for
years running an 80/100W halogen, I'm not going to worry. Now the diode
is there to prevent relay coil voltage spikes on disconnect (when
switching to low
beam) from frying my electronic voltmeter.
Addendum: The supplier has replaced
this 55W kit with one which uses a single integrated
relay and requires no separate battery or ground connections.
Evaluation
Still haven't tested yet, too cold to run the bike, fingers still
recovering from the 2nd install. Powering up will probably wait 'til
spring.
Back to Halogen
The
HID setup worked brightly for about 4 years. This summer on a trip, it
died, and I noticed the absence of headlight in an unlighted tunnel
thru a mountain. The front running lights don't really compensate much,
and with the mechanical bi-xenon setup, there's no other filament to
switch to.
So back to old technology, halogen 80/100W, reasonably bright and if one filament dies, the other is hopefully still avaliable.
 Revised
Schematic
 Winter project time in Ottawa. Fall 2010, bought a 55W bi-xenon HID
motorcycle setup kit and this is what you get from the supplier.
 I
did the initial install in Jan.
2011, my fingers are still thawing out. Based on wire lengths and
available space, I located all components inside the fairing to the
right of the gas tank. Fabricated a little platform for the ballast
from 1/16" lexan, held by 3 existing screws, two frame brackets and the
reflector. Ballast is bolted to this platform.
 As delivered, it used a separate fused lead to the battery, isolated
the high and low beams with a diode, and used a SPST relay to control
the headlight
current. I wasn't too thrilled with the power lead running all the way
back to the battery post.
 Revised
Schematic