MAKING A SOUND MOVIE WITH DIALOG USING A
NOISY,
NON-SYNC FILM CAMERA
by G. Selinsky
Many films including major prize winning feature length films (particularly in Eastern Europe) have been made without shooting "in sync", in other words, using the sound recorded on location as the final sound in the film. The process of adding dialog to the film in post-production is called post-sync, looping, dubbing, or ADR (automatic dialog replacement). The process of recreating and recording other sounds (footsteps, fabric noises, prop noises) is called "foley", or in the case of ambient noises and drones, "ambient track".
This is a quickly written guide for those who wish to film with noisy M.O.S. cameras and don't have money for quiet film cameras with crystal motors, dislike the extra time hassles associated with sync filming (especially when using large and heavy camera blimps, like the Arriflex S120 blimp), and/or enjoy the creative flexibility that the dubbing process offers. I myself am finishing a post-dubbed feature film and am sharing my experience for all of my fellow colleagues out there who want to do the same.
This is written for low budget filmmakers who can't afford some of the more expensive tools available. I decided to offer the lowest cost solution that can provide professional results. It is also written for those who have some basic experience editing picture and sound. I could go into more detail, but this is enough to get the basic theory down for those who wish to get started.
What you need:
When shooting:
Get an assistant to record sound during filming using a video camera or other sound recording device - this will be the scratch soundtrack used later for dubbing. Video cameras (analog and digital) as well as digital sound recording devices (i.e. CD, DAT, minidisc, memory based recorders) do not deviate in speed and are preferrable to analog recorders (i.e. cassette recorders).
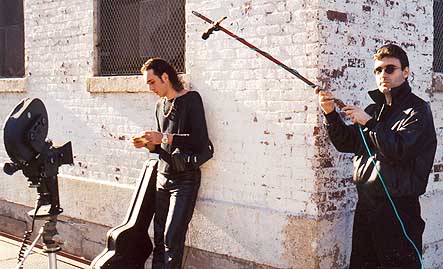
It is best to make an effort to record as clean of a scratch audio track as possible. This helps the actors hear themselves better during dubbing, and also helps the foley artist. Try to keep the camcorder or sound recorder as far away from the noise of the film camera and as close to the talent as possible. Being 45 to 90 degrees away from the film camera is a good option. Attaching a microphone (preferrably a directional one) to the camera/recorder and using a improvised boom, like in the image above (a metal broom handle was used - the mic was taped on it with gaffers tape), is the optimal way tol minimize camera noise and get good sound.
In some instances when filming outdoors, if the mic is close to the talent and far enough away from the film camera (or being enclosed in a car with the camera outside, or vice versa), you may even be able to use the recorded location audio without having to dub. Sometimes, you can remove mininal camera noise via FFT audio filters available in programs such as Sound Forge, Goldwave, and Cool Edit Pro - although these filters tend to adversely affect the overall sound quality (especially if used improperly).
Using a head and tail slate is helpful but not absolutely necessary (actors can clap in lieu of a slate, or you can simply rely on camera noise for synchronization).
Be sure to run your camera as close to 24 fps as you can. Some variable speed electric motors (like those on the Arriflexes) will change speed as the torque in the camera's magazine varies, requiring you to adjust the motor speed. It is best, if possible, to use a constant speed motor and even more preferrable to use a crystal one if available. Spring motors should be rewound before every take.
Syncing the scratch audio to picture:
Digitize the scratch audio, shot by shot. Digitize the video dailies. Import these files into Adobe Premiere.
If you did not use slates, line up the start of the camera noise on the scratch sound file to the beginning flash frame of each shot. The actual start point of the sound should be a bit earlier than the flash frames because the audio device was already running at speed, the camera on the other hand was ramping up to speed.
As your picture and/or sound is not recorded on a sync medium*, the sound will not align perfectly. Use Premiere's "stretch" tool to stretch or compress the scratch audio to fit the sync with the picture. You may find yourself having to cut up the scratch audio file into several smaller clips (using the razor tool) and individually stretching or compressing/stretching them when you have long takes, as the percent of picture/sound speed deviation itself can change (i.e. the picture is moving faster in the beginning of the take due to more film in the takeup of the camera magazine, then slows down as the torque changes, or vice versa).
When done syncing up the scratch audio to picture, create a new video file. This file will have the picture synced to the scratch audio. You can now begin cutting up, logging, and editing the footage.
*If you use a crystal or AC based sync film camera motor and a digital device for recording audio, you may not have to bother making any speed adjustments, aside from a uniform 0.01% adjustment to the sound for the telecine slowdown.
Dubbing the soundtrack:
It is best to dub when a rough cut of the scene is ready. It can help to give an actor a tape of the scene to be dubbed before they show up.
Use a quality condenser mic (dynamic is also acceptable, although it lacks the clarity of the condenser). A preamplifier of some sort (i.e. a tube preamp) is a good idea, as most sound cards have a horrible built in preamp. Use 16 bit 48 khz or higher resolution for recording. Be sure to use a pop filter over the mic - a nylon stocking stretched over a hanger does the job (be sure it doesn't actually touch the mic's screen). This prevents P's and T's from "popping". Dampen the room you will be recording in with thick, plush fabric to cut down on the reverberation as much as possible. Make sure the computer is quiet or isolated in another area where the fan noise won't bleed into the soundtrack.
Select a segment of dialog that you need to dub. Try to pick the shortest segment possible. Set loop points on the timeline in Adobe Premiere where you want the shot to loop (the "in" and "out" markers on the main playback control). Allow enough lead and/or tail space in the shot.
Open a sound recording program. Set the program to begin recording. Go back into Premiere and begin the loop of the shot (hit the looping button, the curved arrow, on the main playback control). The picture should play back on a TV screen, the original scratch audio should be fed into the actor's headphones. Be sure the scratch audio from the actor's headphones doesn't bleed into the soundtrack, you may need to lower the volume.
The actor rehearses at first, then begins making attempts at the dub. At this time it is a good idea to set the proper recording levels on the preamp. Once the actor is comfortable, it is best to turn the scratch audio off and let the actor dub the line without it - if he or she hasn't gotten it already.
Once what appears to be a satisfactory attempt has been achieved, the looping and the recording program is stopped. The most desireable take is selected from the recorded audio file, and saved into a WAV file. This WAV file is then imported into Adobe Premiere, and synchronized on the timeline to the picture. It may take some moving around of the file on the timeline to achieve satisfactory sync. Sometimes it is helpful to look at the audio waveform on the original scratch audio, it serves as a good guide for synchronizing the new dubbed audio track.
Some extra notes: