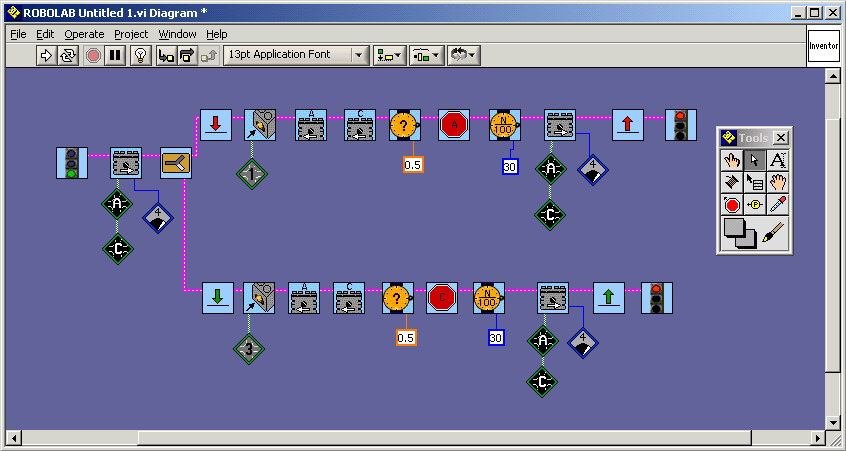
Robolab Programming
This page reviews the basic lego Robolab programming instructions using the
example of the program for the Bumper Cars.

Reading from left to right in the example above:
- the green traffic light starts the program; pink "wires" connect
the instructions in left to right order
- the grey square with the arrow turns motors on in the direction of the arrow;
port letters are attached to the bottom left corner; power level may be attached
to the bottom right corner; this instruction makes the motors attached to
A and C turn forwards with power level 4
- the sideways Y splits the program into 2 tasks; both tasks happen at the
same time; continue reading the upper task
- the red arrow pointing down is the place where the red jump arrow instruction
will land; this is a way of changing the sequence of instructions to jump
to another place in a task; the same colour of jump and land arrows must be
in the same task - notice I have used red in the upper task and green in the
lower task
- the picture of the touch sensor waits for the touch sensor to be pushed;
the sensor port must be attached to the bottom left corner
- the grey square with a letter above turns on the motor attached to that
port letter in the direction of the arrow; these two instructions reverse
motors A and C to make the robot move backwards
- the orange circle waits for a time; if there is a question mark in the circle,
then an amount of time (in seconds) must be attached to the bottom right corner;
this instruction waits for 0.5 s
- the red stop sign stops a motor on the port indicated by the letter in the
middle; if one motor is stopped and the other keeps moving, then the robot
with turn
- the orange circle with N/100 in the middle waits for an amount f time in
hundredths of a second; this instruction waits for 30/100 seconds = 0.30 s
- the grey square is the same motor instruction as at the start of the program;
both A and C motors move forward
- the red arrow pointing up is a jump instruction; the program will jump to
the same colour landing arrow
- both tasks must be ended with their own red traffic light
Notice the Tools Palette at the end of the program. This is where your can
select different mouse pointers for different purposes. The one that is mainly
used for selecting and moving objects is the white arrow in the middle of the
top row. The big letter A beside it chooses to edit text or number boxes (for
changing values). The orange spool at the start of the next row is for wiring
the instructions together.
Look at the top of the main programming window. In the row of buttons below
the menu, the first white arrow is for downloading the program to the RCX. It
also shows if the wiring is correct: when it looks broken, the wiring is wrong,
when it looks clean, the wiring is probably OK and the program is ready to download.
Don't forget to
- turn on the RCX using the red power button
- select which program slot to use on the RCX (3, 4, 5 are best)
- aim the communicator towards the "front" of the RCX and cover
them so other RCX's nearby are not affected
- click on the white arrow to start downloading
- wait for the RCX to make its happy bleep
- use the green button on the RCX to start the program running; press it again
to stop the program

